Lexus NX: Removal
REMOVAL
PROCEDURE
1. REMOVE REAR SEAT ASSEMBLY
(a) for Power Seat:
Click here .gif)
(b) for Manual Seat:
Click here
2. REMOVE REAR FLOOR FINISH PLATE
Click here
3. DISCONNECT REAR DOOR OPENING TRIM WEATHERSTRIP LH
Click here
4. REMOVE UPPER DECK TRIM SIDE BOARD LH
Click here
5. REMOVE ROPE HOOK ASSEMBLY
Click here
6. REMOVE LUGGAGE HOLD BELT STRIKER ASSEMBLY
Click here
7. REMOVE NO. 1 LUGGAGE COMPARTMENT TRIM HOOK
Click here
8. REMOVE DECK TRIM SIDE PANEL ASSEMBLY LH
Click here
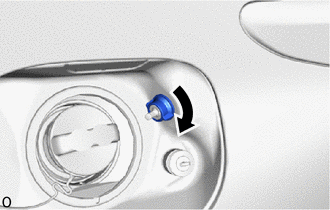
9. REMOVE FUEL FILLER OPENING LID LOCK RETAINER
| (a) Remove the fuel filler opening lid lock retainer as shown in the illustration. |
|
10. REMOVE FUEL LID WITH MOTOR LOCK ASSEMBLY
| (a) Disconnect the connector and remove the fuel lid with motor lock assembly. |
|

READ NEXT:
 Inspection
INSPECTION PROCEDURE 1. INSPECT FUEL LID WITH MOTOR LOCK ASSEMBLY (a) Check the operation of the fuel lid with lock motor assembly. (1) Apply auxiliary battery voltage to the fuel lid with motor lo
Installation
INSTALLATION PROCEDURE 1. INSTALL FUEL LID WITH MOTOR LOCK ASSEMBLY (a) Connect the connector. (b) Install the fuel lid with motor lock assembly. 2. INSTALL FUEL FILLER OPENING LID LOCK RETAINER (a
SEE MORE:
Reserve Lock Switch
ComponentsCOMPONENTS ILLUSTRATION *1 DOOR CONTROL SWITCH *2 PULL HANDLE RemovalREMOVAL PROCEDURE 1. REMOVE PULL HANDLE Click here 2. REMOVE DOOR CONTROL SWITCH (a) Detach the 2 claws and remove the door control switch. InspectionINSPECTION PROCEDURE 1. INSPECT DOOR C
For owners
Reporting safety defects for U.S.
owners
If you believe that your vehicle has
a defect which could cause a crash
or could cause injury or death, you
should immediately inform the
National Highway Traffic Safety
Administration (NHTSA) in addition
to notifying the Lexus Division
of Toyota M
© 2016-2026 Copyright www.lexunx.com
