Lexus NX: Removal
REMOVAL
CAUTION / NOTICE / HINT
HINT:
- Use the same procedure for the RH and LH sides.
- The procedure described below is for the LH side.
PROCEDURE
1. REMOVE FRONT BUMPER ASSEMBLY
(a) except Sport Package:
Click here .gif)
(b) for Sport Package:
Click here
2. REMOVE HEADLIGHT ASSEMBLY LH
(a) Apply protective tape around the headlight assembly LH.
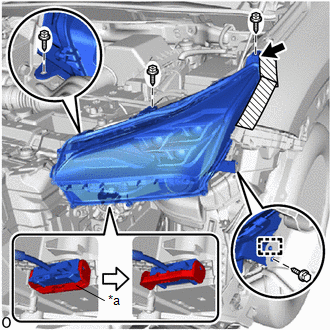
| *a | Connector Lock Lever |
.png) | Place Hands Here |
.png) | Protective Tape |
(b) Remove the 3 screws and bolt.
(c) Place your hand at the location indicated by the black arrow shown in the illustration, and disconnect the seat of the screw.
(d) Detach the guide and remove the headlight assembly LH.
(e) Release the connector lock lever and disconnect the connector.
READ NEXT:
 Disassembly
DISASSEMBLY PROCEDURE 1. PRECAUTION NOTICE:
Be sure to read Precaution thoroughly before servicing.
Click here
Do not reuse parts which have reduced fastening ability due to thread damage.
Wh
Adjustment
ADJUSTMENT CAUTION / NOTICE / HINT HINT:
Use the same procedure for the RH and LH sides.
The procedure listed below is for the LH side.
It is possible that a headlight assembly is incorrectly i
Reassembly
REASSEMBLY CAUTION / NOTICE / HINT NOTICE:
Handle components indoors as much as possible to prevent foreign matter from entering and adhering to headlight assembly components.
Do not reuse parts
SEE MORE:
Data List / Active Test
DATA LIST / ACTIVE TEST DATA LIST NOTICE: In the table below, the values listed under "Normal Condition" are reference values. Do not depend solely on these reference values when deciding whether a part is faulty or not. HINT: Using the Techstream to read the Data List allows the values or states of
Pictorial index
Exterior
The shape of the headlights may differ depending on the grade, etc.
Side doors
Locking/unlocking
Opening/closing the side windows
Locking/unlocking by using the mechanical key
Warning messages
Back door
Opening from inside the cabin*
Opening from outside
Warning mes
© 2016-2026 Copyright www.lexunx.com
