Lexus NX: Removal
REMOVAL
CAUTION / NOTICE / HINT
HINT:
- Use the same procedure for the RH and LH sides.
- The procedure listed below is for the LH side.
PROCEDURE
1. REMOVE OUTER MIRROR LH
(a) Push the upper part of the mirror surface and tilt it.
| (b) Apply protective tape to the areas shown in the illustration. |
|
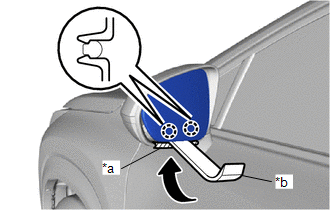
(c) Using a moulding remover D, detach the 2 claws at the lower part of the outer rear view mirror LH.
(d) Push the lower part of the mirror surface and tilt it.
| (e) Apply protective tape to the areas shown in the illustration. |
|
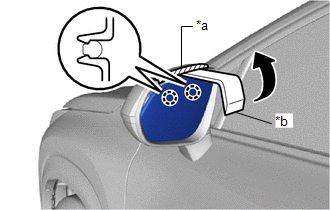
(f) Using a moulding remover D, detach the 2 claws at the upper part of the outer rear view mirror LH, and separate the outer mirror LH.
| (g) w/o EC Mirror: (1) Disconnect the connector and remove the outer mirror LH. |
|
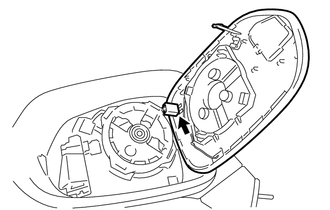
(h) w/ EC Mirror:
| (1) Disconnect the connector(a). |
|
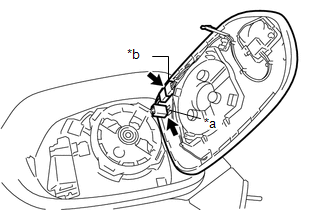
(2) Disconnect the connector(b) and remove the outer mirror LH.
READ NEXT:
 Inspection
INSPECTION PROCEDURE 1. INSPECT OUTER MIRROR LH (a) Check the outer mirror heater operation. (1) Measure the resistance according to the value(s) in the table below. Standard Resistance: Tester
Installation
INSTALLATION CAUTION / NOTICE / HINT HINT:
Use the same procedure for the RH and LH sides.
The procedure listed below is for the LH side.
PROCEDURE 1. INSTALL OUTER MIRROR LH (a) w/o EC Mir
SEE MORE:
Engine Failed to Start (P0A0F-204,P0A0F-205,P0A0F-206,P0A0F-524,P0A0F-525)
DESCRIPTION If an engine malfunction occurs, an engine malfunction signal is sent from the ECM to the hybrid vehicle control ECU. When the hybrid vehicle control ECU receives this signal, it stores a DTC and performs fail-safe control. DTC No. Detection Item DTC Detection Condition Trouble
Removal
REMOVAL PROCEDURE 1. REMOVE MAP LIGHT ASSEMBLY (PERSONAL LIGHT) (a) Using moulding remover D, detach the 4 clips. (b) Disconnect the connectors and remove the map light assembly (personal light).
