Lexus NX: Removal
REMOVAL
PROCEDURE
1. PRECAUTION
CAUTION:
Be sure to read Precoution thoroughly before serving.
Click here .gif)
NOTICE:
After the power switch is turned off, there may be a waiting time before disconnecting the negative (-) auxiliary battery terminal.
Click here
2. REMOVE NO. 3 DECK BOARD SUB-ASSEMBLY
Click here
3. REMOVE REAR DECK FLOOR BOX
Click here
4. REMOVE DECK FLOOR BOX LH
Click here
5. DISCONNECT CABLE FROM NEGATIVE AUXILIARY BATTERY TERMINAL
Click here
CAUTION:
Wait at least 90 seconds after disconnecting the cable from the negative (-) auxiliary battery terminal to disable the SRS system.
6. REMOVE GLOVE COMPARTMENT DOOR ASSEMBLY
Click here
7. REMOVE NO. 2 INSTRUMENT PANEL UNDER COVER SUB-ASSEMBLY
Click here
8. REMOVE ECU INTEGRATION BOX RH
Click here
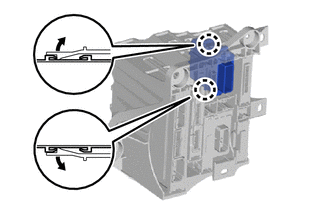
9. REMOVE WINDSHIELD WIPER RELAY ASSEMBLY
| (a) Detach the 2 claws and remove the windshield wiper relay assembly. |
|
READ NEXT:
 Installation
INSTALLATION PROCEDURE 1. INSTALL WINDSHIELD WIPER RELAY ASSEMBLY (a) Attach the 2 claws to install the windshield wiper relay assembly. 2. INSTALL ECU INTEGRATION BOX RH Click here 3. INSTALL NO. 2
Components
COMPONENTS ILLUSTRATION *1 DECK FLOOR BOX LH *2 NO. 3 DECK BOARD SUB-ASSEMBLY *3 REAR DECK FLOOR BOX *4 NEGATIVE AUXILIARY BATTERY TERMINAL N*m (kgf*cm, ft.*lbf): Specified
SEE MORE:
Disassembly
DISASSEMBLY PROCEDURE 1. REMOVE HEADLIGHT WASHER ACTUATOR SUB-ASSEMBLY RH (w/ Headlight Cleaner System) Click here 2. REMOVE HEADLIGHT WASHER ACTUATOR SUB-ASSEMBLY LH (w/ Headlight Cleaner System) HINT: Use the same procedure described for the RH side. 3. REMOVE HEADLIGHT CLEANER WASHER NOZZLE CO
ECU Malfunction (B1362)
DESCRIPTION This DTC is stored when the stereo component equalizer assembly detects an internal malfunction. DTC No. Detection Item DTC Detection Condition Trouble Area B1362 ECU Malfunction An internal malfunction occurs in the stereo component equalizer assembly Stereo component
