Lexus NX: Removal
REMOVAL
PROCEDURE
1. REMOVE AIR CONDITIONING RADIATOR ASSEMBLY
Click here .gif)
2. REMOVE QUICK HEATER ASSEMBLY
Click here
3. REMOVE COOLER EXPANSION VALVE
Click here
4. REMOVE NO. 1 COOLER EVAPORATOR SUB-ASSEMBLY
Click here
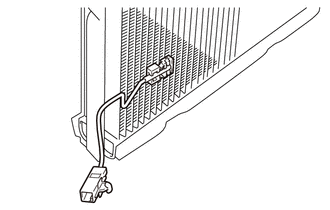
5. REMOVE NO. 1 COOLER THERMISTOR
| (a) Remove the No. 1 cooler thermistor. |
|
READ NEXT:
 Installation
INSTALLATION PROCEDURE 1. INSTALL NO. 1 COOLER THERMISTOR (a) Install the No. 1 cooler thermistor as shown in the illustration. NOTICE:
Be sure to insert the thermistor only once because reins
Components
COMPONENTS ILLUSTRATION *1 AIR CLEANER CAP SUB-ASSEMBLY *2 AIR CLEANER CASE SUB-ASSEMBLY *3 AIR CLEANER FILTER ELEMENT SUB-ASSEMBLY *4 HEATER ACCESSORY ASSEMBLY *5 HEATER WAT
SEE MORE:
Hybrid Transaxle System
On-vehicle InspectionON-VEHICLE INSPECTION PROCEDURE 1. INSPECT FLUID PRESSURE OF OIL PUMP (a) Remove the rear engine under cover LH. Click here (b) Remove the fluid pump cover plug and O-ring from the hybrid vehicle transaxle assembly. (c) Install SST to the hybrid vehicle tr
Lost Communication With Multi-axis Acceleration Sensor Module Missing Message (U012587,U012687,U012987,U029387)
DESCRIPTION DTC No. Detection Item DTC Detection Condition Trouble Area U012587 Lost Communication With Multi-axis Acceleration Sensor Module Missing Message While the vehicle is being driven at 5 km/h (3 mph) or more, a communication error between the airbag ECU assembly and the fo
© 2016-2026 Copyright www.lexunx.com
