Lexus NX: Removal
REMOVAL
PROCEDURE
1. DRAIN ENGINE COOLANT (for Inverter Coolant)
Click here .gif)
2. REMOVE AIR CLEANER CAP SUB-ASSEMBLY
Click here
3. REMOVE AIR CLEANER FILTER ELEMENT SUB-ASSEMBLY
Click here
4. REMOVE AIR CLEANER CASE SUB-ASSEMBLY
Click here
5. REMOVE HEATER ACCESSORY ASSEMBLY
| (a) Disconnect the connector. |
|
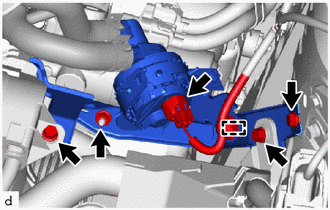
(b) Detach the clamp.
(c) Remove the 3 bolts and nut and disconnect the heater accessory assembly (heater water pump).
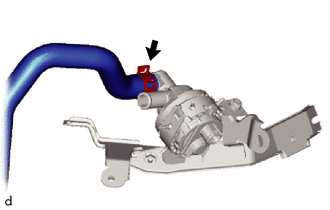
| (d) Using pliers, grip the claws of the clip and slide the clip to disconnect the heater water outlet hose A. NOTICE:
|
|
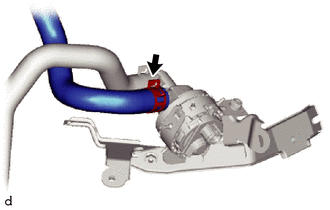
| (e) Using pliers, grip the claws of the clip and slide the clip to disconnect the heater water inlet hose A. NOTICE:
|
|
READ NEXT:
 Inspection
INSPECTION PROCEDURE 1. INSPECT HEATER ACCESSORY ASSEMBLY *a Component without harness connected (Heater Accessory Assembly (Heater Water Pump)) (a) Check the motor operation. (1) Apply the p
Installation
INSTALLATION PROCEDURE 1. INSTALL HEATER ACCESSORY ASSEMBLY (a) Connect the heater water inlet hose A with the paint mark (Blue) facing up and attach the clip within the area shown in the illustrat
SEE MORE:
System Diagram
SYSTEM DIAGRAM Circuit Description Component Outline Steering Lock ECU (Steering Lock Actuator Assembly)
The steering is locked and unlocked by communicating with the certification ECU (smart key ECU assembly) and ID code box (immobiliser code ECU) via LIN communication.
When th
DC / DC Converter Status Circuit Low Input (P0A09-265)
DESCRIPTION Refer to the description for DTC P0A08-264. Click here The hybrid vehicle control ECU sends a signal to the DC/DC converter to prohibit its control and receives signals indicating a normal or abnormal (below 11 V auxiliary battery voltage) condition of the 12 V charging system from th
© 2016-2026 Copyright www.lexunx.com
