Lexus NX: Removal
REMOVAL
PROCEDURE
1. REMOVE FRONT SEAT ASSEMBLY LH
Click here .gif)
2. REMOVE FRONT LOWER SEAT CUSHION SHIELD
Click here
3. REMOVE POWER SEAT SWITCH KNOB LH
Click here
4. REMOVE POWER SEAT SWITCH KNOB LH
Click here
5. REMOVE FRONT SEAT CUSHION SHIELD LH
Click here
6. REMOVE FRONT POWER SEAT SWITCH LH
Click here
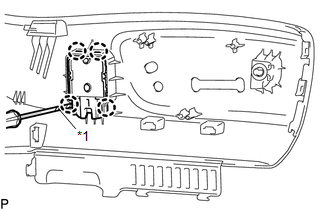
7. REMOVE FRONT LUMBAR POWER SEAT SWITCH
| (a) Using a screwdriver, detach the 4 claws to remove the front lumbar power seat switch. HINT: Tape the screwdriver tip before use. |
|
READ NEXT:
 Inspection
INSPECTION PROCEDURE 1. INSPECT FRONT LUMBAR POWER SEAT SWITCH (a) Measure the resistance according to the value(s) in the table below. Standard Resistance: Tester Connection Switch Condition
Installation
INSTALLATION PROCEDURE 1. INSTALL FRONT LUMBAR POWER SEAT SWITCH (a) Attach the 4 claws to install the front lumbar power seat switch. 2. INSTALL FRONT POWER SEAT SWITCH LH Click here 3. INSTALL FRO
SEE MORE:
Removal
REMOVAL CAUTION / NOTICE / HINT HINT:
Use the same procedure for the RH and LH sides.
The procedure listed below is for the LH side.
PROCEDURE 1. PRECAUTION NOTICE: After the power switch is turned off, there may be a waiting time before disconnecting the negative (-) auxiliary battery termi
Motor Rotation Angle Sensor (C1528)
DESCRIPTION The motor rotation angle sensor detects the motor rotation angle and sends this information to the power steering ECU assembly. DTC No. Detection Item DTC Detection Condition Trouble Area Warning Indicate Return-to-normal Condition C1528 Motor Rotation Angle Sensor M
© 2016-2026 Copyright www.lexunx.com
