Lexus NX: Removal
REMOVAL
CAUTION / NOTICE / HINT
HINT:
- Use the same procedure for the RH and LH sides.
- The procedure listed below is for the LH side.
PROCEDURE
1. REMOVE FRONT SEAT ASSEMBLY LH
Click here .gif)
2. REMOVE FRONT LOWER SEAT CUSHION SHIELD
Click here
3. REMOVE POWER SEAT SWITCH KNOB LH
Click here
4. REMOVE POWER SEAT SWITCH KNOB LH
Click here
5. REMOVE FRONT SEAT CUSHION SHIELD LH
Click here
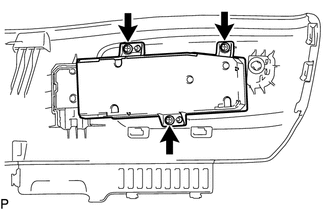
6. REMOVE FRONT POWER SEAT SWITCH LH
| (a) Remove the 3 screws to remove the front power seat switch LH. |
|
READ NEXT:
 Inspection
INSPECTION PROCEDURE 1. INSPECT FRONT POWER SEAT SWITCH LH (w/o Memory) (a) Measure the resistance according to the value(s) in the tables below. Standard Resistance (Slide Switch): Tester Conn
Installation
INSTALLATION CAUTION / NOTICE / HINT HINT:
Use the same procedure for the RH and LH sides.
The procedure listed below is for the LH side.
PROCEDURE 1. INSTALL FRONT POWER SEAT SWITCH LH (a) In
SEE MORE:
Curtain Shield Airbag Sensor (RH) (B1630,B1632,B1635,B1637)
DESCRIPTION The side airbag sensor assembly LH or RH consists of a lateral deceleration sensor, etc. If the airbag ECU assembly receives signals from the lateral deceleration sensor, it determines whether the SRS should be activated. DTC B1630, B1632, B1635 or B1637 is stored when a malfunction is d
Removal
REMOVAL CAUTION / NOTICE / HINT HINT:
Use the same procedure for the RH and LH sides.
The procedure listed below is for the LH side.
PROCEDURE 1. REMOVE FRONT DOOR TRIM COVER LH Click here 2. REMOVE FRONT DOOR INSIDE HANDLE BEZEL PLUG LH Click here 3. REMOVE POWER WINDOW REGULATOR MAST
© 2016-2026 Copyright www.lexunx.com
