
Lexus NX: Removal
REMOVAL
PROCEDURE
1. REMOVE REAR SEAT ASSEMBLY (for Power Seat)
Click here 
2. REMOVE REAR SEAT ASSEMBLY (for Manual Seat)
Click here
3. REMOVE TONNEAU COVER ASSEMBLY
Click here
4. REMOVE DECK BOARD ASSEMBLY
Click here
5. REMOVE NO. 2 DECK BOARD SUB-ASSEMBLY
Click here
6. REMOVE NO. 3 DECK BOARD SUB-ASSEMBLY
Click here
7. REMOVE REAR DECK FLOOR BOX
Click here
8. REMOVE SPARE TIRE
Click here
9. REMOVE NO. 1 SPARE WHEEL CARRIER
10. REMOVE DECK FLOOR BOX RH
Click here
11. REMOVE DECK FLOOR BOX LH
Click here
12. REMOVE NO. 1 TOOL BOX SUB-ASSEMBLY
Click here
13. REMOVE NO. 2 TOOL BOX SUB-ASSEMBLY
Click here
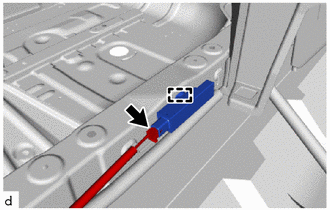
14. REMOVE NO. 3 INDOOR ELECTRICAL KEY ANTENNA ASSEMBLY
NOTICE:
Do not reuse dropped or damaged parts.
(a) Disconnect the connector.
| (b) Detach the clamp and remove the No. 3 indoor electrical key antenna assembly. |
|
READ NEXT:
 Components
COMPONENTS ILLUSTRATION *1 ELECTRICAL KEY ANTENNA *2 QUARTER OUTSIDE MOULDING SUB-ASSEMBLY LH *3 QUARTER OUTSIDE MOULDING SUB-ASSEMBLY RH *4 REAR BUMPER COVER *5 REAR FLOOR S
Removal
REMOVAL PROCEDURE 1. REMOVE QUARTER OUTSIDE MOULDING SUB-ASSEMBLY RH Click here 2. REMOVE QUARTER OUTSIDE MOULDING SUB-ASSEMBLY LH Click here 3. REMOVE REAR FLOOR SIDE MEMBER COVER Click here
SEE MORE:
Inspection
INSPECTION PROCEDURE 1. INSPECT INTEGRATION CONTROL AND PANEL ASSEMBLY (VSC OFF SWITCH) (a) Measure the resistance according to the value(s) in the table below. Standard Resistance: Tester Connection Condition Specified Condition 4 (+) - 1 (GND) Switch not pushed 10 kΩ or higher
Precaution
PRECAUTION HANDLING PRECAUTIONS (a) For safety, when driving the vehicle, the driver should not operate a portable device that is charging. (b) Anyone using an implanted pacemaker, biventricular pacing pulse generator, cardiac defibrillator or other medical electrical device should consult with thei
