Lexus NX: Removal
REMOVAL
PROCEDURE
1. RELEASE PARKING BRAKE
(a) With the power switch on (IG), operate the electric parking brake switch to release the parking brake. Then turn the power switch off.
HINT:
If the parking brake cannot be released,
Click here .gif)
2. REMOVE REAR WHEEL
Click here
3. REMOVE PARKING BRAKE WIRE ASSEMBLY NO.1
| (a) Disconnect the connector from the parking brake wire assembly. |
|
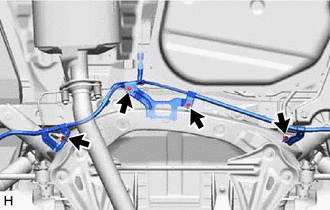
| (b) Remove the 4 bolts and disconnect the parking brake wire bracket. |
|
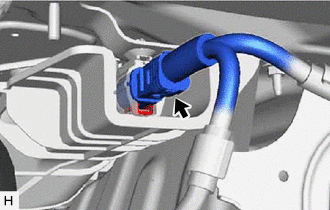
| (c) Disconnect the connector from the parking brake actuator assembly LH. NOTICE:
|
|
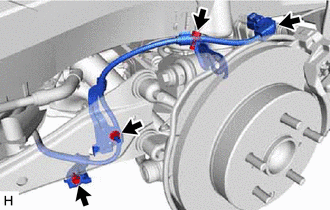
(d) Remove the 2 bolts, nut and parking brake wire assembly.
4. REMOVE PARKING BRAKE ACTUATOR ASSEMBLY LH
| (a) Using a 5 mm hexagon socket wrench, remove the 2 bolts and parking brake actuator assembly LH. |
|
.png)
(b) Remove the O-ring from the rear disc brake cylinder assembly LH.
READ NEXT:
 Inspection
INSPECTION PROCEDURE 1. INSPECT PARKING BRAKE ACTUATOR ASSEMBLY (a) Parking brake actuator assembly operation inspection (1) Apply voltage to the terminals of the parking brake actuator assembly an
Installation
INSTALLATION PROCEDURE 1. INSTALL PARKING BRAKE ACTUATOR ASSEMBLY LH (a) Apply a light coat of lithium soap base glycol grease to the new O-ring. (b) Install the O-ring to the rear disc brake cylinder
SEE MORE:
Drive Motor "B" Current Sensor Circuit (P0A55-687)
DESCRIPTION The MG ECU, which is built into the inverter with converter assembly, monitors its internal operation and will store DTCs if it detects a malfunction. HINT: The term "drive motor B" indicates the rear motor (MGR). DTC No. Detection Item DTC Detection Condition Trouble Area MIL
Radio Broadcast cannot be Received or Poor Reception
WIRING DIAGRAM CAUTION / NOTICE / HINT NOTICE: When replacing the radio receiver assembly, always replace it with a new one. If a radio receiver assembly which was installed to another vehicle is used, the following may occur:
A communication malfunction DTC may be stored.
The radio receiver a
