Lexus NX: Terminals Of Ecu
TERMINALS OF ECU
CHECK AIR CONDITIONING AMPLIFIER ASSEMBLY
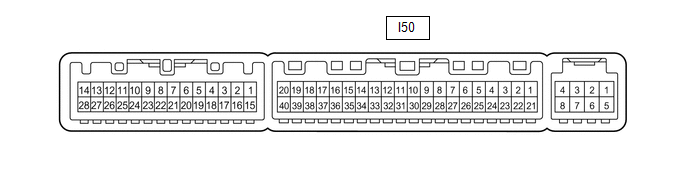
(a) Disconnect the I50 air conditioning amplifier assembly connector.
(b) Measure the voltage and resistance according to the value(s) in the table below.
| Tester Connection | Wiring Color | Terminal Description | Condition | Specified Condition |
|---|---|---|---|---|
| I50-1 (IG+) - Body ground | SB - Body ground | Power source (IG) | Power switch on (IG) | 11 to 14 V |
| Power switch off | Below 1 V | |||
| I50-21 (B) - Body ground | GR - Body ground | Auxiliary battery power supply | Power switch off | 11 to 14 V |
| I50-14 (GND) - Body ground | W-B - Body ground | Ground | Always | Below 1 Ω |
(c) Reconnect the I50 air conditioning amplifier assembly connector.
(d) Measure the voltage according to the value(s) in the table below.
| Tester Connection | Wiring Color | Terminal Description | Condition | Specified Condition |
|---|---|---|---|---|
| I50-39 (FDEF) - Body ground | L - Body ground | Wiper Deicer signal | Power switch on (IG), windshield deicer switch off | 11 to 14 V |
| Power switch on (IG), windshield deicer switch on | Below 2.2 V |
READ NEXT:
 Data List / Active Test
DATA LIST / ACTIVE TEST ACTIVE TEST HINT: Using the Techstream to perform Active Tests allows relays, VSVs, actuators and other items to be operated without removing any parts. This non-intrusive func
Windshield Deicer does not Operate
DESCRIPTION When the windshield deicer switch is operated, the operation signal is transmitted to the radio receiver assembly. The radio receiver assembly transmits the operation signal to the air con
SEE MORE:
Terminals Of Ecu
TERMINALS OF ECU CHECK FORWARD RECOGNITION CAMERA NOTICE:
DTCs may be output when connectors are disconnected during inspection. Therefore, be sure to clear the DTCs using the Techstream once the inspection has been completed.
Do not apply larger loads than necessary since the connector may be
Tachometer Malfunction
DESCRIPTION In this circuit, the combination meter assembly receives engine speed signals from the hybrid vehicle control ECU via the CAN communication system. The combination meter assembly displays the engine speed calculated based on the data received from the hybrid vehicle control ECU. WIRING D
