Lexus NX: Window Glass Antenna Wire
On-vehicle Inspection
ON-VEHICLE INSPECTION
PROCEDURE
1. INSPECT WINDOW GLASS ANTENNA WIRE
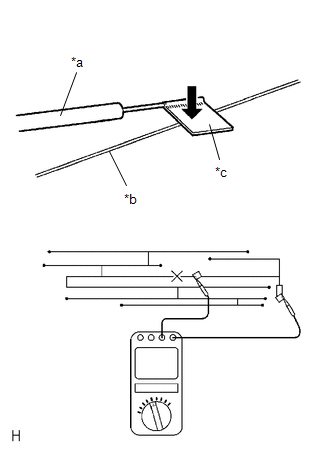
| (a) Check for continuity of the antenna. HINT: Check for continuity at the center of each antenna wire as shown in the illustration. NOTICE:
OK: There is continuity in the antenna. If the result is not as specified, repair the window glass antenna wire. |
|
Repair
REPAIR
PROCEDURE
1. REPAIR WINDOW GLASS ANTENNA WIRE
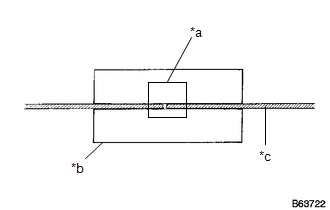
| *a | Repair Point |
| *b | Masking Tape |
| *c | Broken Wire |
(a) Clean the broken wire tips with a grease, wax and silicone remover.
(b) Place masking tape along both sides of the wire to be repaired.
(c) Thoroughly mix the repair agent (DuPont paste No. 4817 or equivalent).
| (d) Using a fine tip brush, apply a small amount of the repair agent to the wire. |
|
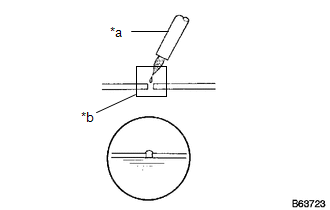
(e) After a few minutes, remove the masking tape.
READ NEXT:
 Dcm(telematics Transceiver)
ComponentsCOMPONENTS ILLUSTRATION *1 DECK FLOOR BOX LH *2 NO. 3 DECK BOARD SUB-ASSEMBLY *3 REAR DECK FLOOR BOX *4 NEGATIVE AUXILIARY BATTERY TERMINAL N*m (kgf*cm, ft.*lbf):
SEE MORE:
Installation
INSTALLATION PROCEDURE 1. INSTALL HV BATTERY JUNCTION BLOCK ASSEMBLY CAUTION: Wear insulated gloves and use insulated tools. (a) Install the hybrid battery junction block assembly with the 3 nuts. Torque: 7.5 N·m {76 kgf·cm, 66 in·lbf} NOTICE: If the hybrid battery junction block assembly has be
Sound Signal Circuit between Radio Receiver and Stereo Jack Adapter
DESCRIPTION The No. 1 stereo jack adapter assembly sends the sound signal from an external device to the radio receiver assembly via this circuit. The sound signal that has been sent is amplified by the stereo component amplifier assembly and then is sent to the speakers. If there is an open or shor
