Lexus NX: Components
COMPONENTS
ILLUSTRATION
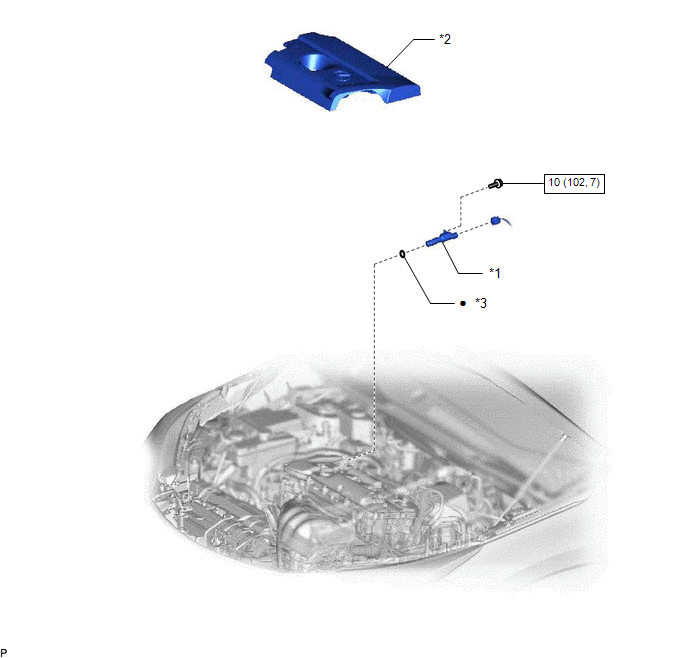
| *1 | CAMSHAFT TIMING OIL CONTROL VALVE ASSEMBLY | *2 | NO. 1 ENGINE COVER SUB-ASSEMBLY |
| *3 | O-RING | - | - |
.png) | N*m (kgf*cm, ft.*lbf): Specified torque | ● | Non-reusable part |
READ NEXT:
 On-vehicle Inspection
ON-VEHICLE INSPECTION PROCEDURE 1. INSPECT CAMSHAFT TIMING OIL CONTROL VALVE ASSEMBLY (a) Connect the Techstream to the DLC3. (b) Turn the Techstream on. (c) Put the engine in inspection mode (mainten
Removal
REMOVAL PROCEDURE 1. REMOVE NO. 1 ENGINE COVER SUB-ASSEMBLY Click here 2. REMOVE CAMSHAFT TIMING OIL CONTROL VALVE ASSEMBLY (a) Disconnect the camshaft timing oil control valve assembly connect
Inspection
INSPECTION PROCEDURE 1. INSPECT CAMSHAFT TIMING OIL CONTROL VALVE ASSEMBLY (a) Measure the resistance according to the value(s) in the table below. Standard Resistance: Tester Connection Conditi
SEE MORE:
Inspection
INSPECTION PROCEDURE 1. INSPECT EGR VALVE ASSEMBLY (a) Measure the resistance. (1) Measure the resistance according to the value(s) in the table below. Standard Resistance: Tester Connection Condition Specified Condition 5 (+B2) - 4 (EGR1) 20°C (68°F) 18 to 22 Ω 5 (+B2) - 6
Removal
REMOVAL CAUTION / NOTICE / HINT HINT:
Use the same procedure for the RH and LH sides.
The procedure described below is for the LH side.
PROCEDURE 1. REMOVE REAR BUMPER ASSEMBLY Click here 2. REMOVE TONNEAU COVER ASSEMBLY Click here 3. REMOVE DECK BOARD ASSEMBLY Click here 4. REMOVE R
© 2016-2026 Copyright www.lexunx.com
