Lexus NX: Inspection
Lexus NX Service Manual / Engine & Hybrid System / 2ar-fxe (emission Control) / Egr Valve / Inspection
INSPECTION
PROCEDURE
1. INSPECT EGR VALVE ASSEMBLY
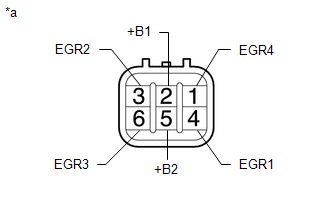
(a) Measure the resistance.
| (1) Measure the resistance according to the value(s) in the table below. Standard Resistance:
If the result is not as specified, replace the EGR valve assembly. |
|
READ NEXT:
 Installation
INSTALLATION CAUTION / NOTICE / HINT HINT: Perform "Inspection After Repair" after replacing the EGR valve assembly. Click here PROCEDURE 1. INSTALL EGR VALVE ASSEMBLY HINT: Perform "Inspection Afte
Parts Location
PARTS LOCATION ILLUSTRATION *1 AIR FUEL RATIO SENSOR (for Bank 1 Sensor 1) *2 CHARCOAL CANISTER ASSEMBLY *3 EGR VALVE ASSEMBLY *4 FUEL TANK CAP ASSEMBLY *5 HEATED OXYGEN SENS
SEE MORE:
Installation
INSTALLATION CAUTION / NOTICE / HINT NOTICE:
Do not replace the spiral cable with the battery connected and the power switch on (IG).
Do not rotate the spiral cable when the following conditions are met: 1) The steering wheel is removed, 2) the battery is connected, and 3) the power switch on (
Invalid Data Received from Hybrid Powertrain Control Module Invalid Serial Data Received (U059481)
DESCRIPTION If the hybrid vehicle control ECU cannot recognize the forward recognition camera. DTC U059481 is stored. DTC No. Detection Item DTC Detection Condition Trouble Area DTC Output from U059481 Invalid Data Received from Hybrid Powertrain Control Module Invalid Serial Data R
© 2016-2026 Copyright www.lexunx.com
