Lexus NX: Components
Lexus NX Service Manual / Vehicle Exterior / Door / Hatch / Fuel Lid Opener Motor Assembly / Components
COMPONENTS
ILLUSTRATION
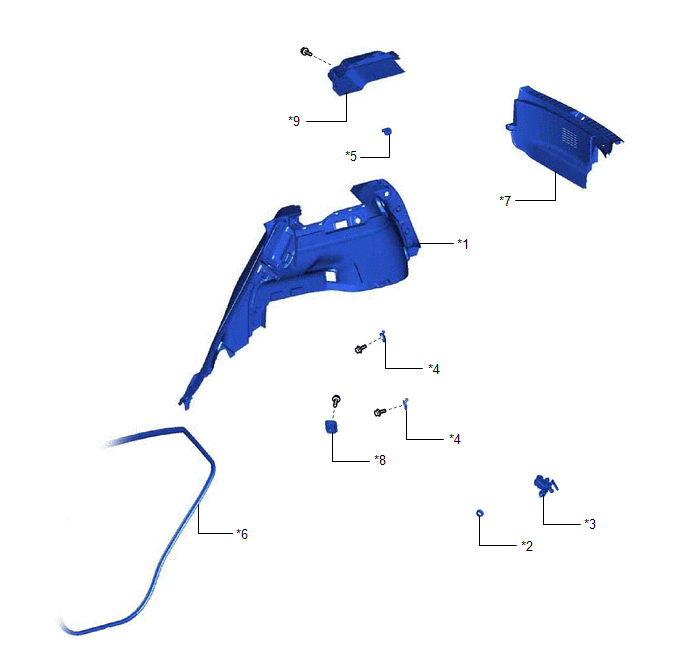
| *1 | DECK TRIM SIDE PANEL ASSEMBLY LH | *2 | FUEL FILLER OPENING LID LOCK RETAINER |
| *3 | FUEL LID WITH MOTOR LOCK ASSEMBLY | *4 | LUGGAGE HOLD BELT STRIKER ASSEMBLY |
| *5 | NO. 1 LUGGAGE COMPARTMENT TRIM HOOK | *6 | REAR DOOR OPENING TRIM WEATHERSTRIP LH |
| *7 | REAR FLOOR FINISH PLATE | *8 | ROPE HOOK ASSEMBLY |
| *9 | UPPER DECK TRIM SIDE BOARD LH | - | - |
READ NEXT:
 Removal
REMOVAL PROCEDURE 1. REMOVE REAR SEAT ASSEMBLY (a) for Power Seat: Click here (b) for Manual Seat: Click here 2. REMOVE REAR FLOOR FINISH PLATE Click here 3. DISCONNECT REAR DOOR OPENING TR
Inspection
INSPECTION PROCEDURE 1. INSPECT FUEL LID WITH MOTOR LOCK ASSEMBLY (a) Check the operation of the fuel lid with lock motor assembly. (1) Apply auxiliary battery voltage to the fuel lid with motor lo
Installation
INSTALLATION PROCEDURE 1. INSTALL FUEL LID WITH MOTOR LOCK ASSEMBLY (a) Connect the connector. (b) Install the fuel lid with motor lock assembly. 2. INSTALL FUEL FILLER OPENING LID LOCK RETAINER (a
SEE MORE:
Components
COMPONENTS ILLUSTRATION *1 DECK FLOOR BOX LH *2 NO. 3 DECK BOARD SUB-ASSEMBLY *3 REAR DECK FLOOR BOX *4 NEGATIVE AUXILIARY BATTERY TERMINAL N*m (kgf*cm, ft.*lbf): Specified torque - - ILLUSTRATION *1 FRONT DOOR ARMREST SET BRACKET LH *2 FRONT DOOR BELT MOU
Cellular Phone Inspection
CAUTION / NOTICE / HINT HINT: If the operation of a cellular phone or the radio receiver assembly is requested, make sure to follow the instructions closely and perform the operation. PROCEDURE 1. CHECK USAGE CONDITION (a) Check that the vehicle and cellular phone meet the following conditi
© 2016-2026 Copyright www.lexunx.com
