Lexus NX: Components
Lexus NX Service Manual / Vehicle Exterior / Door / Hatch / Power Back Door Touch Sensor / Components
COMPONENTS
ILLUSTRATION
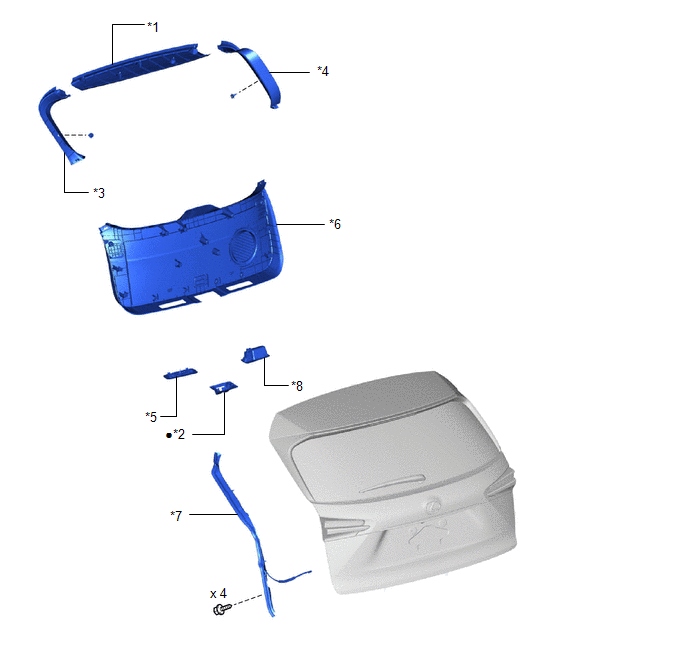
| *1 | BACK DOOR CENTER GARNISH | *2 | BACK DOOR LOCK COVER |
| *3 | BACK DOOR SIDE GARNISH LH | *4 | BACK DOOR SIDE GARNISH RH |
| *5 | BACK DOOR TRIM BASE | *6 | BACK DOOR TRIM BOARD ASSEMBLY |
| *7 | POWER BACK DOOR SENSOR ASSEMBLY LH | *8 | PULL HANDLE |
| ● | Non-reusable part | - | - |
READ NEXT:
 Removal
REMOVAL CAUTION / NOTICE / HINT HINT:
Use the same procedure for the RH and LH sides.
The procedure listed below is for the LH side.
PROCEDURE 1. REMOVE BACK DOOR CENTER GARNISH Click here
Inspection
INSPECTION PROCEDURE 1. INSPECT POWER BACK DOOR SENSOR ASSEMBLY LH (a) Measure the resistance according to the value(s) in the table below. Standard Resistance: Tester Connection Condition
Installation
INSTALLATION CAUTION / NOTICE / HINT HINT:
Use the same procedure for the RH and LH sides.
The procedure listed below is for the LH side.
PROCEDURE 1. INSTALL POWER BACK DOOR SENSOR ASSEMBLY L
SEE MORE:
Customize Parameters
CUSTOMIZE PARAMETERS CUSTOMIZE POWER TILT AND POWER TELESCOPIC STEERING COLUMN SYSTEM HINT: The following items can be customized. NOTICE:
When the customer requests a change in a function, first make sure that the function can be customized.
Record the current settings before customizing.
(
Components
COMPONENTS ILLUSTRATION *1 DECK FLOOR BOX LH *2 NO. 3 DECK BOARD SUB-ASSEMBLY *3 REAR DECK FLOOR BOX *4 NEGATIVE AUXILIARY BATTERY TERMINAL N*m (kgf*cm, ft.*lbf): Specified torque - - ILLUSTRATION *1 BATTERY SERVICE HOLE COVER *2 HYBRID BATTERY SERVICE PLU
© 2016-2026 Copyright www.lexunx.com
