
Lexus NX: Components
COMPONENTS
ILLUSTRATION
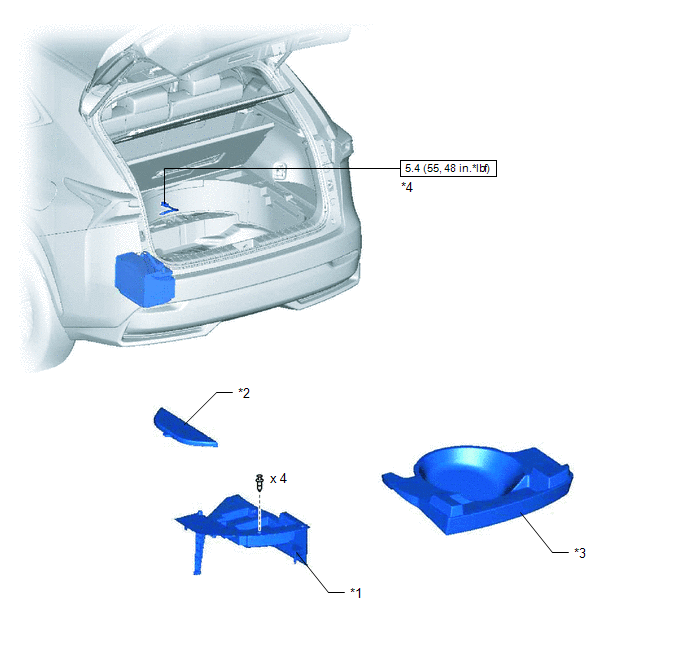
| *1 | DECK FLOOR BOX LH | *2 | NO. 3 DECK BOARD SUB-ASSEMBLY |
| *3 | REAR DECK FLOOR BOX | *4 | NEGATIVE AUXILIARY BATTERY TERMINAL |
.png) | N*m (kgf*cm, ft.*lbf): Specified torque | - | - |
ILLUSTRATION
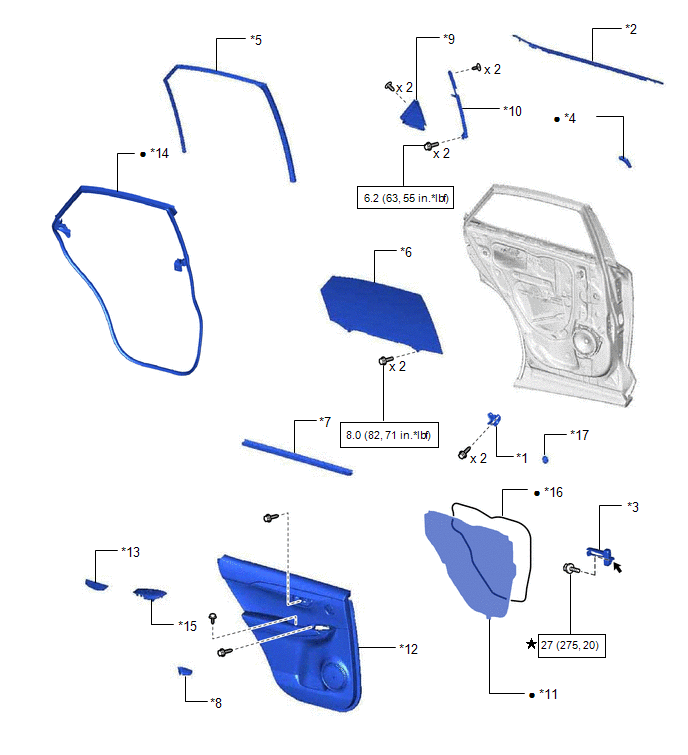
| *1 | REAR DOOR ARMREST SET BRACKET LH | *2 | REAR DOOR BELT MOULDING ASSEMBLY LH |
| *3 | REAR DOOR CHECK ASSEMBLY LH | *4 | REAR DOOR FRAME GARNISH LH |
| *5 | REAR DOOR GLASS RUN LH | *6 | REAR DOOR GLASS SUB-ASSEMBLY LH |
| *7 | REAR DOOR INNER GLASS WEATHERSTRIP LH | *8 | REAR DOOR INSIDE HANDLE BEZEL PLUG LH |
| *9 | REAR DOOR REAR GUIDE SEAL LH | *10 | REAR DOOR REAR LOWER WINDOW FRAME SUB-ASSEMBLY LH |
| *11 | REAR DOOR SERVICE HOLE COVER LH | *12 | REAR DOOR TRIM BOARD SUB-ASSEMBLY LH |
| *13 | REAR DOOR TRIM COVER LH | *14 | REAR DOOR WEATHERSTRIP LH |
| *15 | REAR POWER WINDOW REGULATOR SWITCH ASSEMBLY WITH REAR DOOR ARMREST BASE PANEL | *16 | BUTYL TAPE |
| *17 | HOLE PLUG | - | - |
| | N*m (kgf*cm, ft.*lbf): Specified torque | ★ | Precoated part |
| ● | Non-reusable part | .png) | MP grease |
READ NEXT:
 Removal
REMOVAL CAUTION / NOTICE / HINT HINT:
Use the same procedure for the RH and LH sides.
The procedure listed below is for the LH side.
PROCEDURE 1. PRECAUTION NOTICE: After the power switch off
Installation
INSTALLATION CAUTION / NOTICE / HINT HINT:
Use the same procedure for the RH and LH sides.
The procedure listed below is for the LH side.
PROCEDURE 1. INSTALL REAR DOOR BELT MOULDING ASSEMBLY
SEE MORE:
Components
COMPONENTS ILLUSTRATION *A for 8 Inch Display *B for 10.3 Inch Display *1 CENTER INSTRUMENT CLUSTER FINISH PANEL ASSEMBLY *2 CONSOLE ARMREST ASSEMBLY *3 INSTRUMENT PANEL FINISH PLATE *4 INSTRUMENT SIDE PANEL LH *5 INSTRUMENT SIDE PANEL RH *6 LOWER NO. 1 INSTRU
Problem Symptoms Table
PROBLEM SYMPTOMS TABLE NOTICE: When replacing the radio receiver assembly or navigation ECU, always replace it with a new one. If a radio receiver assembly or navigation ECU which was installed to another vehicle is used, the following may occur:
A communication malfunction DTC may be stored.
T
