Lexus NX: Components
COMPONENTS
ILLUSTRATION
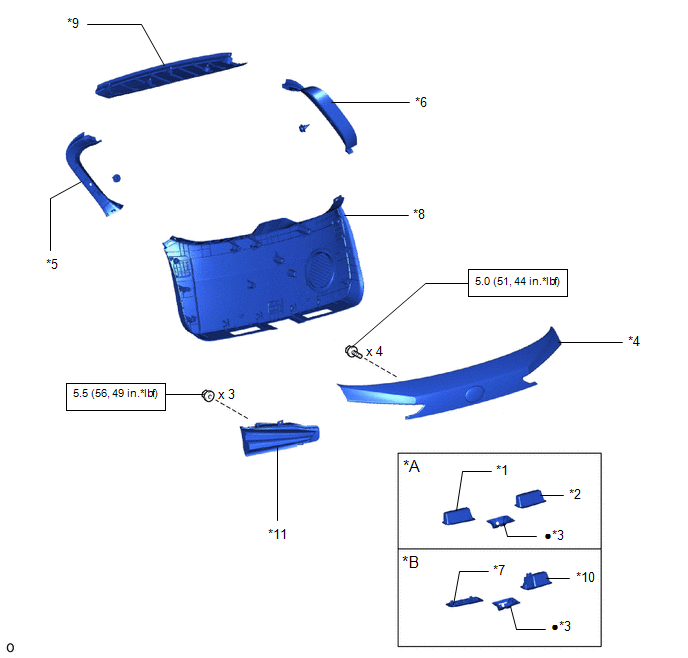
| *A | w/o Power Back Door System | *B | w/ Power Back Door System |
| *1 | BACK DOOR FINISH COVER LH | *2 | BACK DOOR FINISH COVER RH |
| *3 | BACK DOOR LOCK COVER | *4 | BACK DOOR OUTSIDE GARNISH SUB-ASSEMBLY |
| *5 | BACK DOOR SIDE GARNISH LH | *6 | BACK DOOR SIDE GARNISH RH |
| *7 | BACK DOOR TRIM BASE | *8 | BACK DOOR TRIM BOARD ASSEMBLY |
| *9 | CENTER BACK DOOR GARNISH | *10 | PULL HANDLE |
| *11 | REAR LIGHT ASSEMBLY LH | - | - |
.png) | N*m (kgf*cm, ft.*lbf): Specified torque | ● | Non-reusable part |
ILLUSTRATION
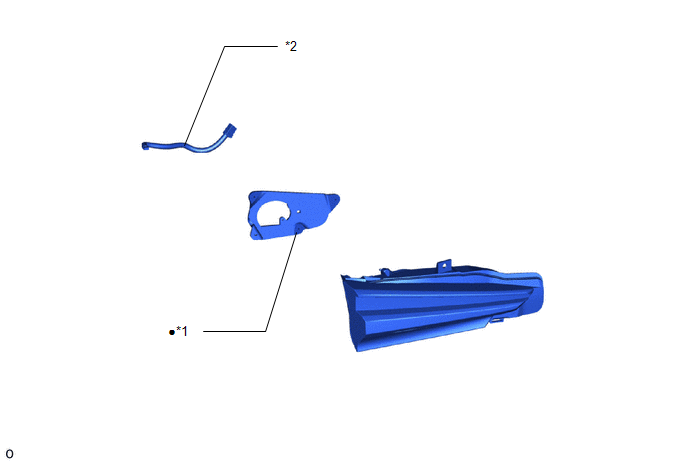
| *1 | REAR LIGHT GASKET LH | *2 | REAR LIGHT SOCKET AND WIRE LH |
| ● | Non-reusable part | - | - |
READ NEXT:
 Removal
REMOVAL CAUTION / NOTICE / HINT HINT:
Use the same procedure for the RH and LH sides.
The procedure described below is for the LH side.
PROCEDURE 1. REMOVE CENTER BACK DOOR GARNISH Click here
Disassembly
DISASSEMBLY CAUTION / NOTICE / HINT HINT:
Use the same procedure for the RH and LH sides.
The procedure listed below is for the LH side.
PROCEDURE 1. REMOVE REAR LIGHT GASKET LH (a) Remove
Inspection
INSPECTION PROCEDURE 1. INSPECT REAR LIGHT ASSEMBLY LH (a) Apply battery voltage to the connector and check the light illumination condition. OK: Battery Connection Specified Condition Po
SEE MORE:
Rain Sensor LIN Communication Malfunction
DESCRIPTION A malfunction occurs in LIN communication of the components related to the rain sensor between the rain sensor and windshield wiper relay assembly. WIRING DIAGRAM CAUTION / NOTICE / HINT NOTICE:
When using the Techstream with the power switch off to troubleshoot:
Connect the Techstre
MIL Circuit
DESCRIPTION The Malfunction Indicator Lamp (MIL) is used to indicate vehicle malfunctions detected by the ECM. The MIL operation can be checked visually. When the power switch is turned on (IG), the MIL should be illuminated and should then turn off after the power switch on (READY). If the MIL rema
© 2016-2026 Copyright www.lexunx.com
