Lexus NX: Disassembly
DISASSEMBLY
CAUTION / NOTICE / HINT
HINT:
- Use the same procedure for the RH and LH sides.
- The procedure listed below is for the LH side.
PROCEDURE
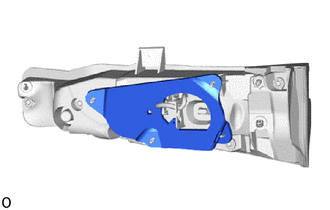
1. REMOVE REAR LIGHT GASKET LH
| (a) Remove the rear light gasket LH. NOTICE: The rear light gasket LH cannot be reused. |
|
2. REMOVE REAR LIGHT SOCKET AND WIRE LH
| (a) Disconnect the connector and detach the wire harness clamp to remove the rear light socket and wire LH. |
|

READ NEXT:
 Inspection
INSPECTION PROCEDURE 1. INSPECT REAR LIGHT ASSEMBLY LH (a) Apply battery voltage to the connector and check the light illumination condition. OK: Battery Connection Specified Condition Po
Reassembly
REASSEMBLY CAUTION / NOTICE / HINT HINT:
Use the same procedure for the RH and LH sides.
The procedure listed below is for the LH side.
PROCEDURE 1. INSTALL REAR LIGHT SOCKET AND WIRE LH (a) A
Installation
INSTALLATION CAUTION / NOTICE / HINT HINT:
Use the same procedure for the RH and LH sides.
The procedure described below is for the LH side.
PROCEDURE 1. INSTALL REAR LIGHT ASSEMBLY LH (a)
SEE MORE:
If your vehicle needs to be towed
If towing is necessary, we recommend
having your vehicle towed by
your Lexus dealer or commercial
towing service, using a wheel-lift
type truck or flatbed truck.
Use a safety chain system for all
towing, and abide by all state/provincial
and local laws.
If towing your vehicle with a whee
System Description
SYSTEM DESCRIPTION SEAT BELT WARNING SYSTEM DESCRIPTION HINT: The front seat belt warning light on the combination meter assembly is used for both the driver side seat and front passenger side seat. (a) Front seat belt warning light operation for driver side seat belt: The seat belt warning light on
© 2016-2026 Copyright www.lexunx.com
