Lexus NX: Components
Lexus NX Service Manual / Vehicle Interior / Interior Panels / Trim / Combination Switch / Components
COMPONENTS
ILLUSTRATION
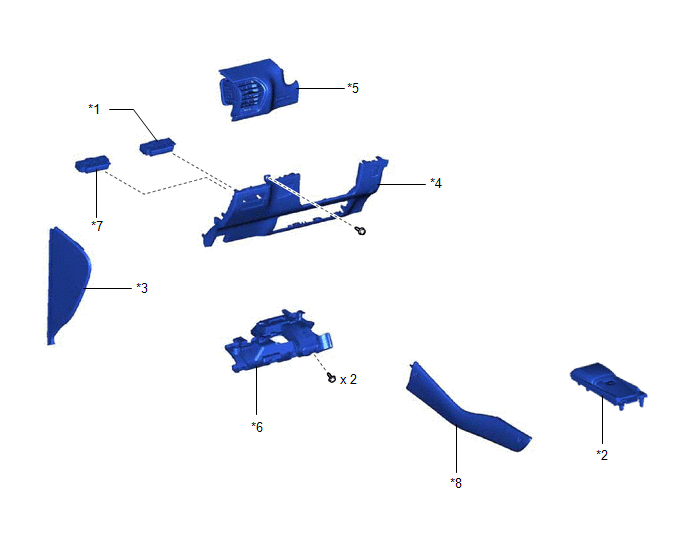
| *1 | COMBINATION SWITCH ASSEMBLY | *2 | CONSOLE ARMREST ASSEMBLY |
| *3 | INSTRUMENT SIDE PANEL LH | *4 | LOWER NO. 1 INSTRUMENT PANEL FINISH PANEL |
| *5 | NO. 1 INSTRUMENT PANEL SAFETY PAD SUB-ASSEMBLY | *6 | NO. 1 INSTRUMENT PANEL UNDER COVER SUB-ASSEMBLY |
| *7 | NO. 2 COMBINATION SWITCH ASSEMBLY | *8 | UPPER NO. 2 CONSOLE PANEL GARNISH |
READ NEXT:
 Removal
REMOVAL PROCEDURE 1. REMOVE CONSOLE ARMREST ASSEMBLY Click here 2. REMOVE UPPER NO. 2 CONSOLE PANEL GARNISH Click here 3. REMOVE INSTRUMENT SIDE PANEL LH Click here 4. REMOVE NO. 1 INSTRUM
Installation
INSTALLATION PROCEDURE 1. INSTALL COMBINATION SWITCH ASSEMBLY (for Upper Side) (a) Attach the 4 claws to install the combination switch assembly. 2. INSTALL NO. 2 COMBINATION SWITCH ASS
SEE MORE:
Disposal
DISPOSAL CAUTION / NOTICE / HINT CAUTION: Before performing pre-disposal deployment of any SRS part, review and closely follow all applicable environmental and hazardous material regulations. Pre-disposal deployment may be considered hazardous material treatment. PROCEDURE 1. PRECAUTION CAUTION:
Installation
INSTALLATION PROCEDURE 1. INSTALL HOOD LOCK CONTROL CABLE ASSEMBLY (a) Tie the string that was passed through the engine compartment room to the end of the hood lock control cable assembly as shown in the illustration. HINT: Use a length of string long enough to pass through the engine compartmen
© 2016-2026 Copyright www.lexunx.com
