Lexus NX: Components
Lexus NX Service Manual / Audio & Visual & Telematics / Audio / Video / Quarter Trim Speaker / Components
COMPONENTS
ILLUSTRATION
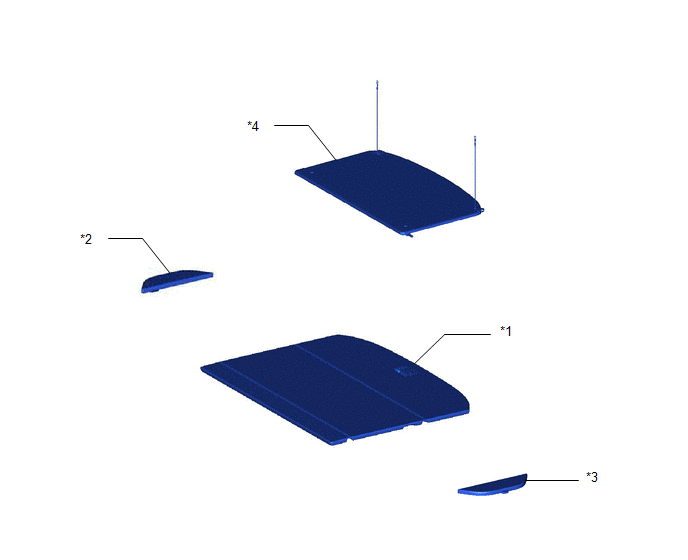
| *1 | DECK BOARD ASSEMBLY | *2 | NO. 2 DECK BOARD SUB-ASSEMBLY |
| *3 | NO. 3 DECK BOARD SUB-ASSEMBLY | *4 | TONNEAU COVER ASSEMBLY |
ILLUSTRATION
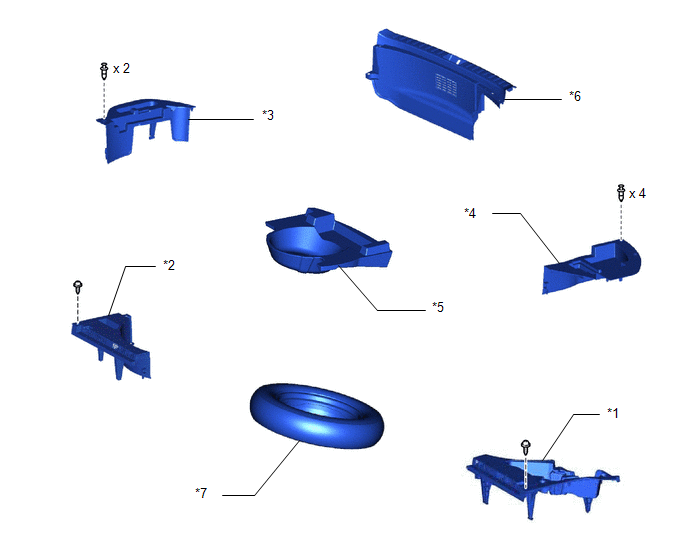
| *1 | DECK FLOOR BOX LH | *2 | DECK FLOOR BOX RH |
| *3 | NO. 1 TOOL BOX SUB-ASSEMBLY | *4 | NO. 2 TOOL BOX SUB-ASSEMBLY |
| *5 | REAR DECK FLOOR BOX | *6 | REAR FLOOR FINISH PLATE |
| *7 | SPARE TIRE | - | - |
ILLUSTRATION
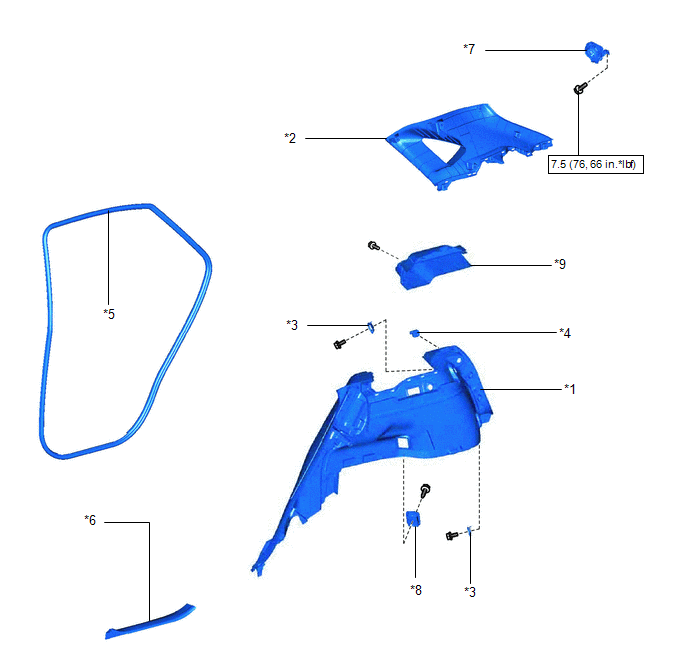
| *1 | DECK TRIM SIDE PANEL ASSEMBLY LH | *2 | INNER ROOF SIDE GARNISH ASSEMBLY LH |
| *3 | LUGGAGE HOLD BELT STRIKER ASSEMBLY | *4 | NO. 1 LUGGAGE COMPARTMENT TRIM HOOK |
| *5 | REAR DOOR OPENING TRIM WEATHERSTRIP LH | *6 | REAR DOOR SCUFF PLATE LH |
| *7 | REAR HEADER SPEAKER ASSEMBLY | *8 | ROPE HOOK ASSEMBLY |
| *9 | UPPER DECK TRIM SIDE BOARD LH | - | - |
.png) | N*m (kgf*cm, ft.*lbf) : Specified torque | - | - |
READ NEXT:
 Removal
REMOVAL PROCEDURE 1. REMOVE REAR SEAT ASSEMBLY (for Manual Seat) Click here 2. REMOVE REAR SEAT ASSEMBLY (for Power Seat) Click here 3. REMOVE TONNEAU COVER ASSEMBLY Click here 4. REMOVE DECK B
Inspection
INSPECTION PROCEDURE 1. INSPECT REAR HEADER SPEAKER ASSEMBLY (a) Measure the resistance according to the value(s) in the table below. Standard Resistance: Tester Connection Condition Specif
Installation
INSTALLATION PROCEDURE 1. INSTALL REAR HEADER SPEAKER ASSEMBLY NOTICE: Do not touch the cone part of the speaker. (a) Temporarily install the speaker by attaching the clip of the speaker to the veh
SEE MORE:
Problem Symptoms Table
PROBLEM SYMPTOMS TABLE HINT:
Use the table below to help determine the cause of problem symptoms. If multiple suspected areas are listed, the potential causes of the symptoms are listed in order of probability in the "Suspected Area" column of the table. Check each symptom by checking the suspect
LED Headlight LH Circuit Malfunction (B2430,B2431)
DESCRIPTION The illumination of the low beam headlights is controlled by the main body ECU (multiplex network body ECU). When the headlights are turned on, the main body ECU (multiplex network body ECU) receives a signal from the headlight assembly and detects the illumination condition of the low b
© 2016-2026 Copyright www.lexunx.com
