Lexus NX: Components
Lexus NX Service Manual / Vehicle Interior / Theft Deterrent / Keyless Entry / Intrusion Sensor / Components
COMPONENTS
ILLUSTRATION
.png)
| *1 | DECK FLOOR BOX LH | *2 | NO. 3 DECK BOARD SUB-ASSEMBLY |
| *3 | REAR DECK FLOOR BOX | *4 | NEGATIVE AUXILIARY BATTERY TERMINAL |
.png) | N*m (kgf*cm, ft.*lbf): Specified torque | - | - |
ILLUSTRATION
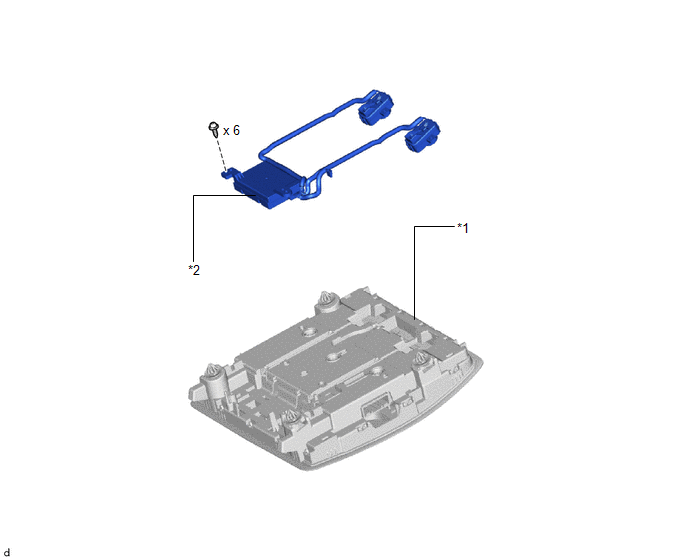
| *1 | MAP LIGHT ASSEMBLY | *2 | THEFT WARNING ULTRASONIC SENSOR |
READ NEXT:
 Removal
REMOVAL PROCEDURE 1. REMOVE DECK BOARD ASSEMBLY Click here 2. REMOVE NO. 3 DECK BOARD SUB-ASSEMBLY Click here 3. REMOVE REAR DECK FLOOR BOX (w/ Spare Tire) Click here 4. REMOVE DECK FLOOR BOX LH
Installation
INSTALLATION PROCEDURE 1. INSTALL THEFT WARNING ULTRASONIC SENSOR (a) Attach the 4 clamps to install the theft warning ultrasonic sensor. (b) Install the 6 screws and connect the connector. 2. INSTALL
Security Horn Assembly
ComponentsCOMPONENTS ILLUSTRATION *1 SECURITY HORN ASSEMBLY - - N*m (kgf*cm, ft.*lbf): Specified torque - - RemovalREMOVAL PROCEDURE 1. REMOVE SECURITY HORN ASSEMBLY (a) R
SEE MORE:
Reassembly
REASSEMBLY PROCEDURE 1. INSTALL LOWER NO. 2 INSTRUMENT PANEL FINISH PANEL (a) Install the lower No. 2 instrument panel finish panel with the 4 screws. 2. INSTALL NO. 2 INSTRUMENT CLUSTER FINISH PANEL GARNISH (a) Attach the 2 clips to install the No. 2 instrument cluster finish pane
Power Supply Drive Circuit (C1257)
DESCRIPTION The skid control ECU (brake booster with master cylinder assembly) detects a drop in accumulator pressure according to the signals from the accumulator pressure sensor, then operates and stops the motor relay as well as the pump motor. The skid control ECU (brake booster with master cyli
© 2016-2026 Copyright www.lexunx.com
