Lexus NX: Components
COMPONENTS
ILLUSTRATION
.png)
| *1 | DECK FLOOR BOX LH | *2 | NO. 3 DECK BOARD SUB-ASSEMBLY |
| *3 | REAR DECK FLOOR BOX | *4 | NEGATIVE AUXILIARY BATTERY TERMINAL |
.png) | N*m (kgf*cm, ft.*lbf): Specified torque | - | - |
ILLUSTRATION
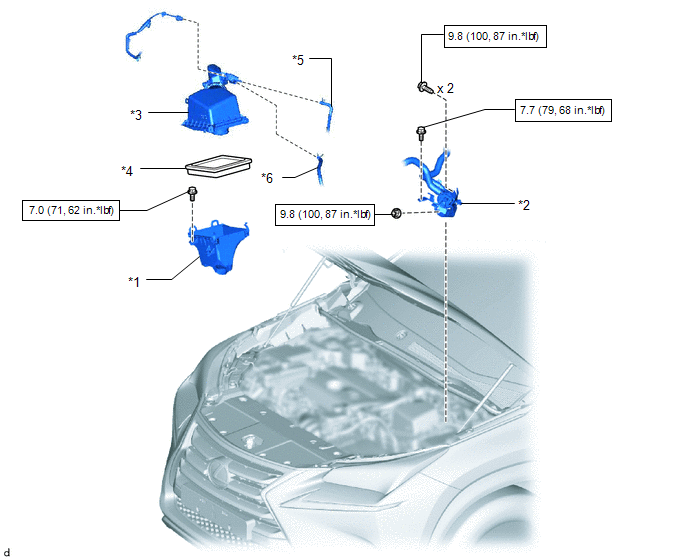
| *1 | AIR CLEANER CASE SUB-ASSEMBLY | *2 | HEATER ACCESSORY ASSEMBLY |
| *3 | AIR CLEANER CAP SUB-ASSEMBLY | *4 | AIR CLEANER FILTER ELEMENT SUB-ASSEMBLY |
| *5 | FUEL VAPOR FEED HOSE | *6 | NO. 2 FUEL VAPOR FEED HOSE |
| | N*m (kgf*cm, ft.*lbf): Specified torque | - | - |
ILLUSTRATION
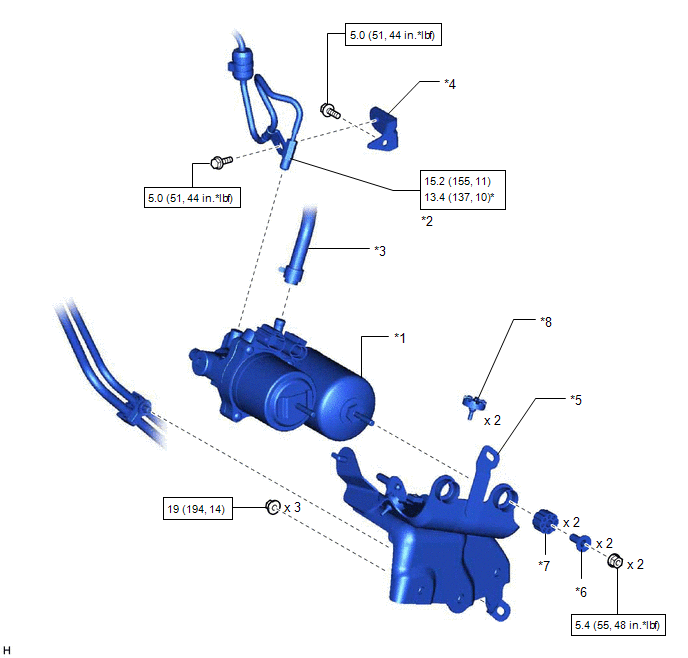
| *1 | BRAKE BOOSTER PUMP ASSEMBLY | *2 | FRONT NO. 1 BRAKE TUBE |
| *3 | NO. 1 BRAKE ACTUATOR HOSE | *4 | NO. 1 BRAKE TUBE CLAMP BRACKET |
| *5 | BRAKE ACTUATOR BRACKET ASSEMBLY | *6 | BRAKE ACTUATOR CASE COLLAR |
| *7 | BRAKE BOOSTER PUMP BUSHING | *8 | BRAKE ACTUATOR BRACKET CUSHION |
| | N*m (kgf*cm, ft.*lbf): Specified torque | * | For use with union nut wrench |
READ NEXT:
 Removal
REMOVAL CAUTION / NOTICE / HINT NOTICE: While the auxiliary battery is connected, even if the power switch is off, the brake control system activates when the brake pedal is depressed or any door cour
Inspection
INSPECTION PROCEDURE 1. INSPECT BRAKE BOOSTER PUMP ASSEMBLY (a) Measure the resistance according to the value(s) in the table below. Standard Resistance: Tester Connection Condition Specifi
Installation
INSTALLATION PROCEDURE 1. INSTALL BRAKE BOOSTER PUMP ASSEMBLY (a) Install the 2 brake actuator bracket cushions to the brake actuator bracket assembly. (b) Install the brake booster pump assembly,
SEE MORE:
Components
COMPONENTS ILLUSTRATION *A w/ Woofer *B w/o Woofer *1 BACK DOOR CENTER GARNISH *2 BACK DOOR LOCK COVER *3 BACK DOOR SIDE GARNISH LH *4 BACK DOOR SIDE GARNISH RH *5 BACK DOOR TRIM BASE *6 BACK DOOR TRIM BOARD ASSEMBLY *7 POWER BACK DOOR WARNING BUZZER *
Climate Control System does not Operate on Passenger Side
DESCRIPTION The air conditioning control assembly sends operation signals to the air conditioning amplifier assembly via the LIN communication line. The air conditioning amplifier assembly actives the seat blowers according to these signals. WIRING DIAGRAM CAUTION / NOTICE / HINT NOTICE:
The cli
© 2016-2026 Copyright www.lexunx.com
