Lexus NX: Components
Lexus NX Service Manual / Engine & Hybrid System / 2ar-fxe (cooling) / Cooling Fan Motor / Components
COMPONENTS
ILLUSTRATION
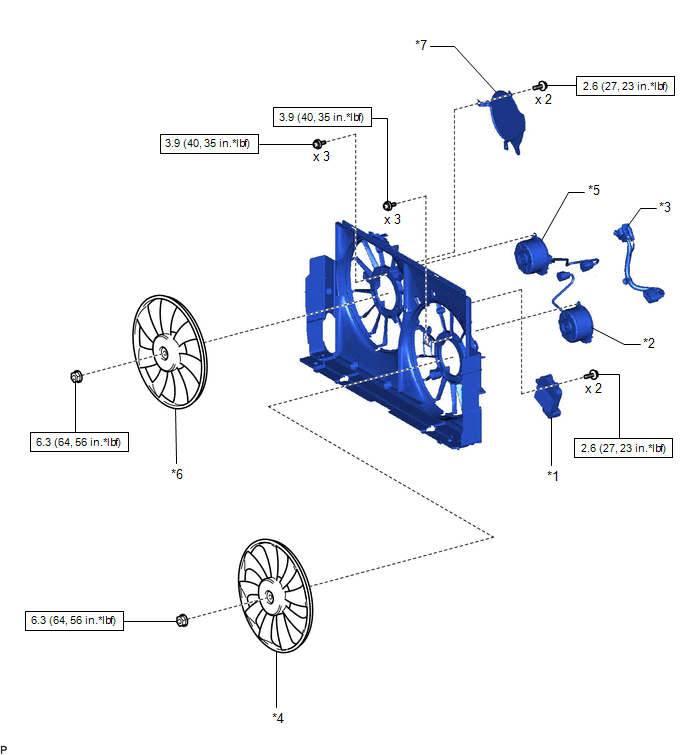
| *1 | COOLING FAN ECU | *2 | COOLING FAN MOTOR |
| *3 | COOLING FAN WIRE | *4 | FAN |
| *5 | NO. 2 COOLING FAN MOTOR | *6 | NO. 2 FAN |
| *7 | COOLING FAN MOTOR INSULATOR | - | - |
 | N*m (kgf*cm, ft.*lbf): Specified torque | - | - |
READ NEXT:
 On-vehicle Inspection
ON-VEHICLE INSPECTION PROCEDURE 1. INSPECT COOLING FAN MOTOR (a) Disconnect the cooling fan motor connector. (b) Check that the fan rotates smoothly by hand. (c) Check that the cooling fan motor tu
Removal
REMOVAL PROCEDURE 1. REMOVE FAN SHROUD WITH COOLING FAN Click here 2. REMOVE COOLING FAN WIRE (a) Disconnect the cooling fan ECU connector. (b) Detach the 3 clamps and remove the cool
Installation
INSTALLATION PROCEDURE 1. INSTALL NO. 2 COOLING FAN MOTOR (a) Attach the 2 clamps and install the No. 2 cooling fan motor with the 3 screws. Torque: 3.9 N·m {40 kgf·cm, 35 in·lbf} (b) Install the
SEE MORE:
Installation
INSTALLATION CAUTION / NOTICE / HINT HINT:
Use the same procedure for the RH and LH sides.
The procedure described below is for the LH side.
PROCEDURE 1. INSTALL HEADLIGHT ASSEMBLY LH (a) w/o Headlight ECU: Connect the 2 connectors and attach the wire harness clamp. *A w/o
Footwell Light Circuit
DESCRIPTION The main body ECU (multiplex network body ECU) controls the operation of the following lights:
No. 1 interior illumination light assembly LH
No. 1 interior illumination light assembly RH
WIRING DIAGRAM CAUTION / NOTICE / HINT NOTICE:
Inspect the fuses for circuits related to
© 2016-2026 Copyright www.lexunx.com
