Lexus NX: Disassembly
DISASSEMBLY
PROCEDURE
1. REMOVE HOOD INSULATOR
| (a) Using a clip remover, remove the 7 clips. |
|
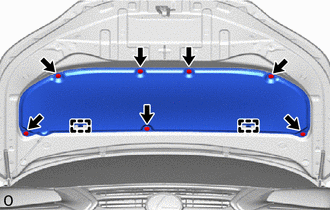
(b) Detach the 2 guides and remove the hood insulator.
2. REMOVE HOOD TO FRONT FENDER SEAL LH
| (a) Using a clip remover, detach the 2 claws and remove the hood to front fender seal LH. |
|
3. REMOVE HOOD TO FRONT FENDER SEAL RH
HINT:
Use the same procedure as for the LH side.
4. REMOVE WASHER NOZZLE SUB-ASSEMBLY
Click here .gif)
5. DISCONNECT WASHER HOSE ASSEMBLY
| (a) Detach the 4 clamps and disconnect the washer hose assembly. |
|

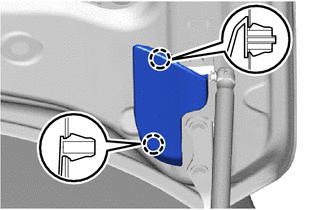
6. REMOVE HOOD AUXILIARY CATCH HOOK ASSEMBLY
(a) Remove the 2 bolts.
(b) Detach the guide and remove the hood auxiliary catch hook assembly.
7. REMOVE RADIATOR SUPPORT OPENING COVER
Click here
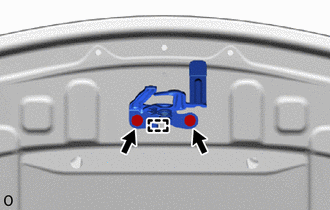
8. REMOVE ENGINE HOOD LOCK STRIKER ASSEMBLY
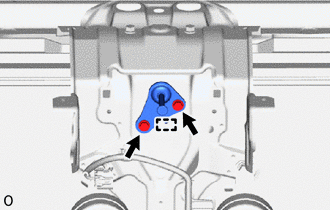
(a) Remove the 2 bolts.
(b) Detach the guide and remove the engine hood lock striker assembly.
READ NEXT:
 Adjustment
ADJUSTMENT CAUTION / NOTICE / HINT HINT:
Centering bolts are used to mount the hood hinge to the vehicle body and hood. The hood cannot be adjusted with the centering bolts on. Substitute the cente
Reassembly
REASSEMBLY PROCEDURE 1. INSTALL ENGINE HOOD LOCK STRIKER ASSEMBLY (a) Attach the guide. (b) Install the engine hood lock striker assembly with the 2 bolts. Torque: 8.0 N·m {82 kgf·cm, 71 in·lbf} 2
SEE MORE:
Sound Quality is Bad Only when Disc is Played (Volume is Too Low)
CAUTION / NOTICE / HINT NOTICE: When replacing the radio receiver assembly, always replace it with a new one. If a radio receiver assembly which was installed to another vehicle is used, the following may occur:
A communication malfunction DTC may be stored.
The radio receiver assembly may not
Seat belts
Make sure that all occupants are
wearing their seat belts before driving
the vehicle.
WARNING
Observe the following precautions to
reduce the risk of injury in the event of
sudden braking, sudden swerving or an
accident.
Failure to do so may cause death or serious
injury.
■Wearing a se
