Lexus NX: Disassembly
DISASSEMBLY
CAUTION / NOTICE / HINT
HINT:
- Use the same procedure for the RH and LH sides.
- The procedure listed below is for the LH side.
PROCEDURE
1. REMOVE NO. 5 MOULDING TAPE
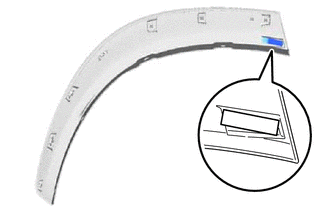
(a) Remove the No. 5 moulding tape (double-sided tape).
HINT:
Do not pull on the No. 5 moulding tape (double-sided tape). Instead, roll the tape up with your finger to remove it cleanly.
.png)
(b) Using non-residue solvent and a cloth, wipe off any No. 5 moulding tape (double-sided tape) remaining on the quarter outside moulding sub-assembly LH.
2. REMOVE REAR LOWER QUARTER MOULDING PROTECTOR LH
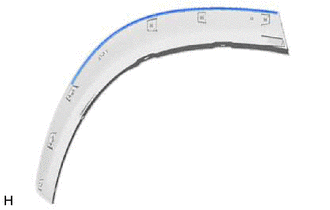
(a) Remove the rear lower quarter moulding protector LH (double-sided tape).
HINT:
Do not pull on the rear lower quarter moulding protector LH (double-sided tape). Instead, roll the tape up with your finger to remove it cleanly.
(b) Using non-residue solvent and a cloth, wipe off any rear lower quarter moulding protector LH (double-sided tape) remaining on the quarter outside moulding sub-assembly LH.
READ NEXT:
 Reassembly
REASSEMBLY CAUTION / NOTICE / HINT HINT:
Use the same procedure for the RH and LH sides.
The procedure listed below is for the LH side.
PROCEDURE 1. INSTALL NO. 5 MOULDING TAPE (a) Clean the N
Installation
INSTALLATION CAUTION / NOTICE / HINT PROCEDURE 1. INSTALL QUARTER OUTSIDE MOULDING SUB-ASSEMBLY LH HINT: When installing the quarter outside moulding sub-assembly LH, heat the vehicle body and quarter
SEE MORE:
Terminals Of Ecu
TERMINALS OF ECU CHECK AIR CONDITIONING AMPLIFIER ASSEMBLY (a) Disconnect the I50 air conditioning amplifier assembly connector. (b) Measure the voltage and resistance according to the value(s) in the table below. Tester Connection Wiring Color Terminal Description Condition Specified Co
Light bulbs
You may replace the following bulbs
by yourself.
The difficulty level of replacement
varies depending on the bulb. If
necessary bulb replacement seems
difficult to perform, contact your
Lexus dealer.
For more information about replacing
other light bulbs, contact your
Lexus dealer.
Bul
