Lexus NX: Disassembly
DISASSEMBLY
CAUTION / NOTICE / HINT
HINT:
- Use the same procedure for the RH and LH sides.
- The procedure listed below is for the LH side.
PROCEDURE
1. REMOVE FRONT TURN SIGNAL LIGHT BULB
(a) Turn the bulb socket counterclockwise until the matchmark is aligned with the unlock position mark to disconnect the bulb socket.
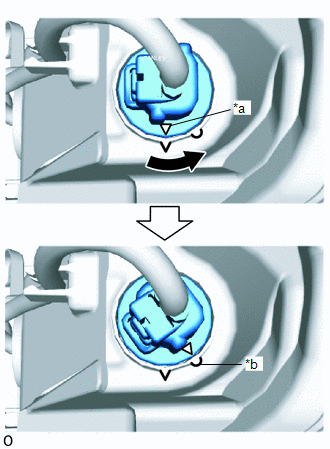
| *a | Matchmark |
| *b | Unlock Position Mark |
.png) | Counterclockwise |
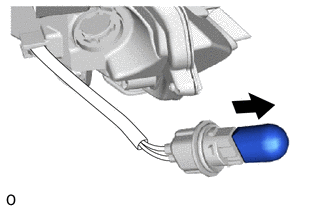
| (b) Remove the front turn signal light bulb from the bulb socket. |
|
READ NEXT:
 Inspection
INSPECTION PROCEDURE 1. INSPECT CLEARANCE LIGHT ASSEMBLY LH (a) Apply battery voltage to the connector and check the light illumination condition. OK: Condition Specified Condition Batter
Reassembly
REASSEMBLY CAUTION / NOTICE / HINT HINT:
Use the same procedure for the RH and LH sides.
The procedure listed below is for the LH side.
PROCEDURE 1. INSTALL FRONT TURN SIGNAL LIGHT BULB (a) In
Installation
INSTALLATION CAUTION / NOTICE / HINT HINT:
Use the same procedure for the RH and LH sides.
The procedure described below is for the LH side.
PROCEDURE 1. INSTALL CLEARANCE LIGHT ASSEMBLY LH (a
SEE MORE:
System Description
SYSTEM DESCRIPTION POWER MIRROR CONTROL SYSTEM DESCRIPTION (a) This system has the following functions: power retract function, auto power retract function, electrical remote control function, reverse shift-linked function, memory function, automatic glare-resistant EC mirror function and mirror hea
Inspection
INSPECTION PROCEDURE 1. INSPECT POWER WINDOW REGULATOR MOTOR ASSEMBLY LH NOTICE:
Do not apply voltage to any terminals except terminals 1 and 2 to avoid damaging the pulse sensor inside the motor.
Reset the power window regulator motor (initialize the pulse sensor) after installing the power wi
© 2016-2026 Copyright www.lexunx.com
