Lexus NX: Installation
INSTALLATION
CAUTION / NOTICE / HINT
HINT:
- Use the same procedure for the RH and LH sides.
- The procedure described below is for the LH side.
PROCEDURE
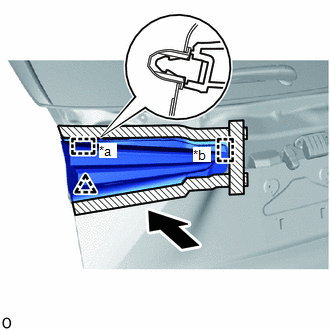
1. INSTALL REAR LIGHT ASSEMBLY LH
| (a) Attach the guide, clip and pin to set the rear light assembly LH. |
|
(b) Install the 3 nuts.
Torque:
5.5 N·m {56 kgf·cm, 49 in·lbf}
(c) Connect the connector.
2. INSTALL BACK DOOR OUTSIDE GARNISH SUB-ASSEMBLY
Click here .gif)
3. INSTALL BACK DOOR TRIM BOARD ASSEMBLY
Click here
4. INSTALL BACK DOOR LOCK COVER (w/o Power Back Door)
Click here
5. INSTALL BACK DOOR LOCK COVER (w/ Power Back Door)
Click here
6. INSTALL BACK DOOR FINISH COVER LH (w/o Power Back Door)
Click here
7. INSTALL BACK DOOR FINISH COVER RH (w/o Power Back Door)
Click here
8. INSTALL PULL HANDLE (w/ Power Back Door)
Click here
9. INSTALL BACK DOOR TRIM BASE (w/ Power Back Door)
Click here
10. INSTALL BACK DOOR SIDE GARNISH LH
Click here
11. INSTALL BACK DOOR SIDE GARNISH RH
Click here
12. INSTALL CENTER BACK DOOR GARNISH
Click here
READ NEXT:
 Components
COMPONENTS ILLUSTRATION *1 LOWER OUTER MIRROR COVER LH *2 OUTER MIRROR BEZEL LH *3 OUTER MIRROR COVER LH *4 OUTER MIRROR LH *5 SIDE TURN SIGNAL LIGHT ASSEMBLY LH - -
Removal
REMOVAL CAUTION / NOTICE / HINT HINT:
Use the same procedure for the RH and LH sides.
The procedure described below is for the LH side.
PROCEDURE 1. REMOVE OUTER MIRROR LH Click here 2. REM
SEE MORE:
Removal
REMOVAL CAUTION / NOTICE / HINT HINT: When the front bumper is damaged or deformed due to an accident or contact with other objects, etc., or the bumper installation area on the body is repaired, it is necessary to perform millimeter wave radar sensor adjustment (See page ). PROCEDURE 1. PRECAUTION
System Diagram
SYSTEM DIAGRAM Transmitting ECU (Transmitter) Receiving ECU (Receiver) Signal Communication Method Airbag ECU Assembly Hybrid Vehicle Control ECU Crash detection signal CAN Combination Meter Assembly
SRS warning light on demand signal
SRS warning light blink demand s
