Lexus NX: Disassembly
DISASSEMBLY
PROCEDURE
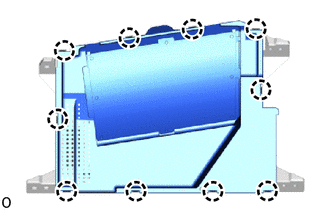
1. REMOVE NO. 1 COMBINATION METER MIRROR PLATE
| (a) Detach the 10 claws and remove the No. 1 combination meter mirror plate from the meter mirror sub-assembly (headup display). |
|
READ NEXT:
 Reassembly
REASSEMBLY PROCEDURE 1. INSTALL NO. 1 COMBINATION METER MIRROR PLATE (a) Attach the 10 claws to install the No. 1 combination meter mirror plate to the meter mirror sub-assembly (headup display).
Installation
INSTALLATION PROCEDURE 1. INSTALL METER MIRROR SUB-ASSEMBLY (HEADUP DISPLAY) (a) Install the meter mirror sub-assembly (headup display) with the 4 screws. *a Screw *b Connector
SEE MORE:
Operation Check
OPERATION CHECK INSPECT ILLUMINATED ENTRY SYSTEM OPERATION NOTICE: Perform this inspection with the customizable parameters set to the initial settings. HINT: When inspecting the following functions, make sure that the map light switch and spot light switch are in the DOOR position. (a) The interior
Inspection
INSPECTION PROCEDURE 1. INSPECT FOG LIGHT ASSEMBLY LH (a) Apply battery voltage to the connector and check the light illumination condition. OK: Battery Connection Specified Condition Positive (+) → 2 (B) Negative (-) → 3 (CRPL) Negative (-) → 4 (E) A and B illuminates Posit
© 2016-2026 Copyright www.lexunx.com
