Lexus NX: Front Wiper Rubber
Components
COMPONENTS
ILLUSTRATION
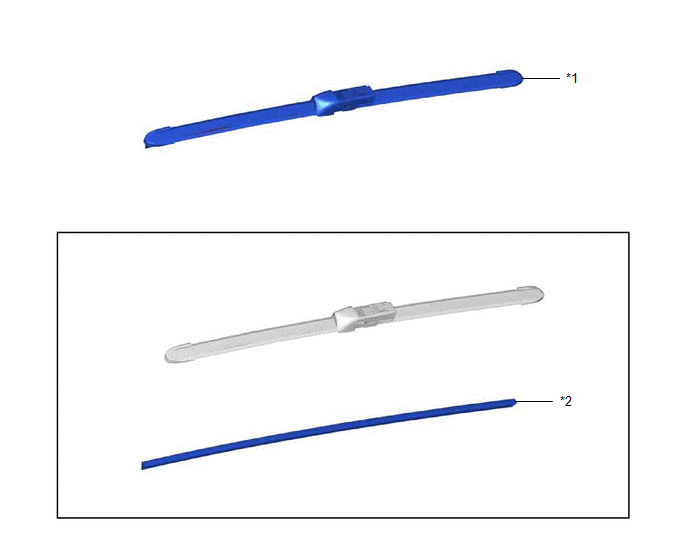
| *1 | FRONT WIPER BLADE LH | *2 | WIPER RUBBER LH |
Replacement
REPLACEMENT
CAUTION / NOTICE / HINT
HINT:
- Use the same procedure for RHD and LHD vehicles.
- The procedure listed below is for LHD vehicles.
- Use the same procedure for the RH and LH sides.
- The procedure listed below is for the LH side.
PROCEDURE
1. REMOVE FRONT WIPER BLADE LH
| (a) Push the lock button of the front wiper blade LH to release the lock. |
|

(b) Remove the front wiper blade from the front wiper arm as shown in the illustration.
NOTICE:
Do not lower the front wiper arm with the front wiper blade removed. The arm tip may damage the windshield surface.
2. REMOVE WIPER RUBBER LH
| (a) Pull the wiper rubber LH in the direction indicated by the arrow shown in the illustration. |
|
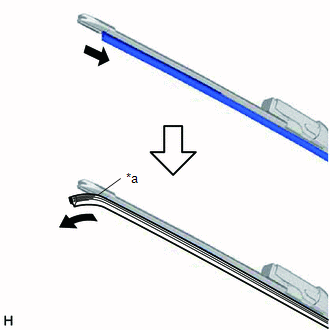
(b) Pull the front wiper rubber from the slit of the front wiper blade LH to remove it.
HINT:
The wiper rubber can be removed from either end of the front wiper blade LH.
3. INSTALL WIPER RUBBER LH
| (a) Install the front wiper rubber through the slit of the front wiper blade LH. HINT: The wiper rubber can be installed from either end of the front wiper blade LH. |
|
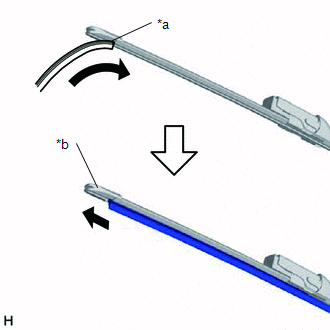
(b) Pull the wiper rubber LH in the direction indicated by the arrow shown in the illustration so that it fits into the cap of the front front wiper blade LH.
NOTICE:
Make sure that the wiper rubber LH is fitted securely into the cap and cannot be removed.
4. INSTALL FRONT WIPER BLADE LH
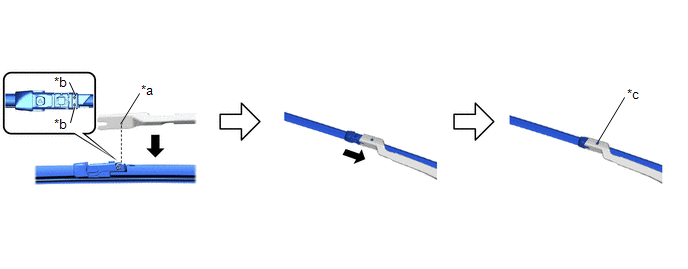
| *a | Front Wiper Arm Protrusion | *b | Front Wiper Blade Indentation |
| *c | Lock Button | - | - |
(a) Align the protrusion of the front wiper arm LH with the indentation of the front wiper blade LH and lower the front wiper arm LH.
(b) Slide the front wiper blade LH until the lock button is locked to install the front wiper blade LH.
NOTICE:
Make sure that the lock button locks so that it is installed securely.
READ NEXT:
 Headlight Cleaner Actuator
ComponentsCOMPONENTS ILLUSTRATION *1 HEADLIGHT CLEANER WASHER BRACKET *2 HEADLIGHT WASHER ACTUATOR SUB-ASSEMBLY LH *3 HEADLIGHT WASHER ACTUATOR SUB-ASSEMBLY RH *4 NO. 2 HEADLIGHT
Headlight Cleaner Actuator Cover
ComponentsCOMPONENTS ILLUSTRATION *1 HEADLIGHT CLEANER WASHER NOZZLE COVER LH *2 HEADLIGHT CLEANER WASHER NOZZLE COVER RH *3 HEADLIGHT WASHER ACTUATOR SUB-ASSEMBLY LH *4 HEADLIGHT
Headlight Cleaner Control Relay (for Single Beam Headlight)
ComponentsCOMPONENTS ILLUSTRATION *1 FRONT BUMPER COVER *2 HEADLIGHT CLEANER CONTROL RELAY On-vehicle InspectionON-VEHICLE INSPECTION PROCEDURE 1. INSPECT HEADLIGHT CLEANER CONTROL RELA
SEE MORE:
Problem Symptoms Table
PROBLEM SYMPTOMS TABLE HINT:
Use the table below to help determine the cause of problem symptoms. If multiple suspected areas are listed, the potential causes of the symptoms are listed in order of probability in the "Suspected Area" column of the table. Check each symptom by checking the suspect
Parts Location
PARTS LOCATION ILLUSTRATION *1 NO. 2 ENGINE ROOM RELAY BLOCK - ODS FUSE *2 FRONT SEAT INNER BELT ASSEMBLY RH *3 AIR CONDITIONING CONTROL ASSEMBLY *4 OCCUPANT DETECTION ECU *5 COMBINATION METER ASSEMBLY *6 AIRBAG ECU ASSEMBLY *7 FRONT OCCUPANT CLASSIFICATION SENSOR
