Lexus NX: Hazard Warning Switch
Inspection
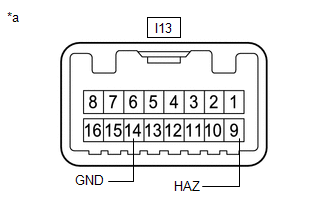
INSPECTION
PROCEDURE
1. INSPECT AIR CONDITIONING CONTROL ASSEMBLY (HAZARD WARNING SWITCH)
(a) Remove the air conditioning control assembly.
Click here .gif)
(b) Inspect the hazard warning switch.
| (1) Measure the resistance according to the value(s) in the table below. Standard Resistance:
If the result is not as specified, replace the air conditioner control assembly. |
|
READ NEXT:
 Precaution
PRECAUTION NOTICE: When disassembling the headlight assembly, use static electricity countermeasures SST (desktop antistatic mat set) and observe all precautions to prevent damage to the system by ele
Components
COMPONENTS ILLUSTRATION *1 HEADLIGHT ASSEMBLY LH - - N*m (kgf*cm, ft.*lbf): Specified torque - - ILLUSTRATION *1 HEADLIGHT ECU SUB-ASSEMBLY LH *2 HEADLIGHT GASKET
SEE MORE:
Voice Recognition Microphone Disconnected (B1579)
DESCRIPTION The radio receiver assembly and telephone microphone assembly are connected to each other using the microphone connection detection signal lines. This DTC is stored when a microphone connection detection signal line is disconnected. DTC No. Detection Item DTC Detection Condition
Egr Cooler
ComponentsCOMPONENTS ILLUSTRATION *1 EGR COOLER ASSEMBLY *2 NO. 5 WATER BY-PASS HOSE *3 STUD BOLT *4 GASKET *5 NO. 1 WATER BY-PASS PIPE *6 NO. 1 EGR PIPE N*m (kgf*cm, ft.*lbf): Specified torque ● Non-reusable part RemovalREMOVAL PROCEDURE 1. REMOVE EXH
© 2016-2026 Copyright www.lexunx.com
