Lexus NX: Inspection
INSPECTION
PROCEDURE
1. INSPECT ENGINE COOLANT TEMPERATURE SENSOR
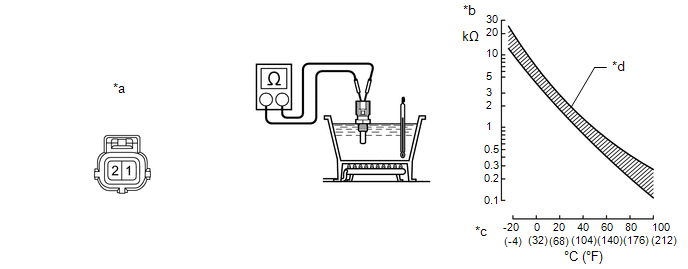
| *a | Component without harness connected (Engine Coolant Temperature Sensor) | *b | Resistance |
| *c | Temperature | *d | Acceptable Range |
(a) Partially immerse the sensor in water and warm up the water.
(b) Measure the resistance according to the value(s) in the table below.
Standard Resistance:
| Tester Connection | Condition | Specified Condition |
|---|---|---|
| 1 - 2 | 20°C (68°F) | 2.32 to 2.59 kΩ |
| 80°C (176°F) | 0.310 to 0.326 kΩ |
NOTICE:
When checking the engine coolant temperature sensor in water, keep the terminals dry. After the check, wipe the engine coolant temperature sensor dry.
If the result is not as specified, replace the engine coolant temperature sensor.
READ NEXT:
 Installation
INSTALLATION CAUTION / NOTICE / HINT HINT: Perform "Inspection After Repairs" after replacing the engine coolant temperature sensor. Click here PROCEDURE 1. INSTALL ENGINE COOLANT TEMPERATURE SENSOR
Heated Oxygen Sensor
ComponentsCOMPONENTS ILLUSTRATION *1 FRONT EXHAUST PIPE SUB-ASSEMBLY *2 HEATED OXYGEN SENSOR *3 COMPRESSION SPRING *4 GASKET N*m (kgf*cm, ft.*lbf): Specified torque * F
Ignition Coil And Spark Plug
ComponentsCOMPONENTS ILLUSTRATION *1 IGNITION COIL ASSEMBLY *2 NO. 1 ENGINE COVER SUB-ASSEMBLY *3 SPARK PLUG - - N*m (kgf*cm, ft.*lbf) : Specified torque - - Remova
SEE MORE:
Removal
REMOVAL PROCEDURE 1. PRECAUTION NOTICE:
Be sure to read Precaution thoroughly before servicing.
Click here
Handle components indoors as much as possible to prevent foreign matter from entering and adhering to headlight assembly components.
Do not reuse parts which have reduced fastening abi
Drive Motor "B" Control Module (P0A1C-118)
DTC SUMMARY MALFUNCTION DESCRIPTION These DTCs indicate that an overvoltage in the inverter has occurred. The cause of this malfunction may be one of the following: Internal inverter malfunction
Inverter internal circuit malfunction
Malfunction in ECU that controls the inverter
DESCRIPTION F
© 2016-2026 Copyright www.lexunx.com
