Lexus NX: Inspection
INSPECTION
PROCEDURE
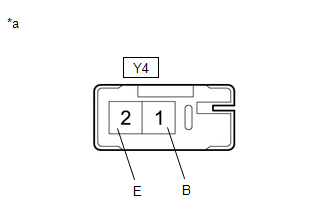
1. INSPECT LICENSE PLATE LIGHT ASSEMBLY LH
| (a) Apply auxiliary battery voltage to the connector and check the light illumination condition. OK:
If the result is not as specified, replace the license plate light assembly LH. |
|
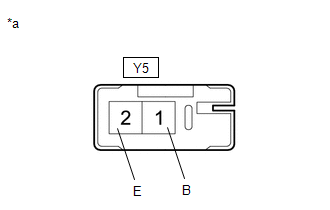
2. INSPECT LICENSE PLATE LIGHT ASSEMBLY RH
| (a) Apply auxiliary battery voltage to the connector and check the light illumination condition. OK:
If the result is not as specified, replace the license plate light assembly RH. |
|
READ NEXT:
 Installation
INSTALLATION CAUTION / NOTICE / HINT HINT:
Use the same procedure for the RH and LH sides.
The procedure described below is for the LH side.
PROCEDURE 1. INSTALL LICENSE PLATE LIGHT ASSEMBLY L
Precaution
PRECAUTION PRECAUTION FOR HEADLIGHT BULB REPLACEMENT (a) If even a thin film of oil is left on the surface of a headlight bulb, its service life will be shortened because the light will burn at a high
SEE MORE:
Inspection
INSPECTION PROCEDURE 1. INSPECT FOG LIGHT ASSEMBLY LH (a) Apply battery voltage to the connector and check the light illumination condition. OK: Battery Connection Specified Condition Positive (+) → 2 (B) Negative (-) → 3 (CRPL) Negative (-) → 4 (E) A and B illuminates Posit
Installation
INSTALLATION CAUTION / NOTICE / HINT NOTICE:
When the brake pedal is first depressed after replacing the brake pads or pushing back the disc brake piston, DTC C1214 may be output. As there is no malfunction, clear the DTC.
While the auxiliary battery is connected, even if the power switch is of
