Lexus NX: Inspection
INSPECTION
PROCEDURE
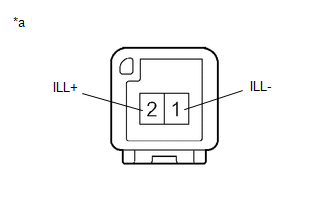
1. INSPECT CONSOLE BOX ILLUMINATION LIGHT ASSEMBLY
| (a) Apply battery voltage to the connector and check the light illumination condition. OK:
If the result is not as specified, replace the console box illumination light assembly. |
|
READ NEXT:
 Installation
INSTALLATION PROCEDURE 1. INSTALL CONSOLE BOX ILLUMINATION LIGHT ASSEMBLY (w/ Wireless Charger) (a) Attach the 2 claws to install the console box illumination light assembly. (b) Connec
Footwell Light
ComponentsCOMPONENTS ILLUSTRATION *A for Driver Side *B for Front Passenger Side *1 NO. 1 INSTRUMENT PANEL UNDER COVER SUB-ASSEMBLY *2 NO. 1 INTERIOR ILLUMINATION LIGHT ASSEMBLY L
Front Door Courtesy Switch
ComponentsCOMPONENTS ILLUSTRATION *1 FRONT DOOR COURTESY LIGHT SWITCH ASSEMBLY - - N*m (kgf*cm, ft.*lbf): Specified torque - - RemovalREMOVAL CAUTION / NOTICE / HINT HINT:
SEE MORE:
Problem Symptoms Table
PROBLEM SYMPTOMS TABLE HINT:
Use the table below to help determine the cause of problem symptoms. If multiple suspected areas are listed, the potential causes of the symptom are listed in order of probability in the "Suspected Area" column of the table. Check each symptom by checking the suspecte
Disposal
DISPOSAL PROCEDURE 1. DISPOSE OF REAR SHOCK ABSORBER ASSEMBLY LH *A w/o AVS *B w/ AVS (a) Extend the piston rod and secure the rear shock absorber assembly at an angle in a vise. (b) Using a drill, make a hole in the cylinder between A and B shown in the illustration to discharge the
© 2016-2026 Copyright www.lexunx.com
