Lexus NX: Inspection
INSPECTION
PROCEDURE
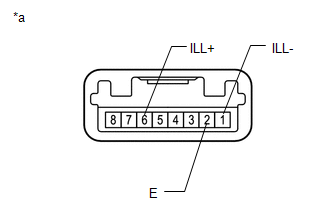
1. INSPECT CLOCK ASSEMBLY
| (a) Check the illumination. Apply auxiliary battery voltage to the connector and check the illumination condition. OK:
If the result is not as specified, replace the clock assembly. |
|
READ NEXT:
 Installation
INSTALLATION PROCEDURE 1. INSTALL CLOCK ASSEMBLY (a) Attach the 2 claws to install the clock assembly. 2. INSTALL AIR CONDITIONING CONTROL ASSEMBLY (a) Connect the connectors.
Parts Location
PARTS LOCATION ILLUSTRATION *1 CLOCK ASSEMBLY *2 COMBINATION METER ASSEMBLY *3 RADIO RECEIVER ASSEMBLY *4 INSTRUMENT PANEL JUNCTION BLOCK ASSEMBLY - ACC FUSE - PANEL FUSE *5
SEE MORE:
Motor Rotation Angle Sensor (C1528)
DESCRIPTION The motor rotation angle sensor detects the motor rotation angle and sends this information to the power steering ECU assembly. DTC No. Detection Item DTC Detection Condition Trouble Area Warning Indicate Return-to-normal Condition C1528 Motor Rotation Angle Sensor M
Removal
REMOVAL CAUTION / NOTICE / HINT HINT:
Use the same procedure for the RH and LH sides.
The procedure listed below is for the LH side.
PROCEDURE 1. REMOVE REAR WHEEL Click here 2. DISCONNECT REAR SPEED SENSOR LH (a) w/ AVS: Click here (b) w/o AVS: Click here 3. DISCONNECT PARKING BRAKE W
© 2016-2026 Copyright www.lexunx.com
