Lexus NX: Inspection
INSPECTION
PROCEDURE
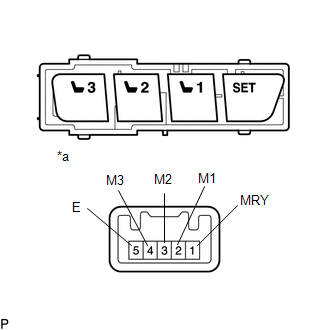
1. INSPECT SEAT MEMORY SWITCH
| (a) Measure the resistance according to the value(s) in the table below. Standard Resistance:
If the result is not as specified, replace the seat memory switch. |
|
READ NEXT:
 Installation
INSTALLATION PROCEDURE 1. INSTALL FRONT SEAT SLIDE SWITCH BEZEL (a) Attach the 6 claws to install the front seat slide switch bezel. 2. INSTALL SEAT MEMORY SWITCH (a) Attach the 4 claws to install the
SEE MORE:
Sending Malfunction (Navigation to APGS) (U0073,U0100,U0129,U0140,U0155,U0164,U0198,U023B,U0265,U0293,U1110)
DESCRIPTION These DTCs are stored when a malfunction occurs in the CAN communication circuit. DTC No. Detection Item DTC Detection Condition Trouble Area U0073 Sending Malfunction (Navigation to APGS) CAN bus connection error CAN communication system U0100 Engine ECU Communi
Installation
INSTALLATION PROCEDURE 1. INSTALL INTEGRATION CONTROL AND PANEL ASSEMBLY (a) Install the integration control and panel assembly to the rear upper console panel sub-assembly with the 2 screws. HINT: The locations labeled A in the illustration are tightened together with the shift position indicato
© 2016-2026 Copyright www.lexunx.com
