Lexus NX: Inspection
INSPECTION
PROCEDURE
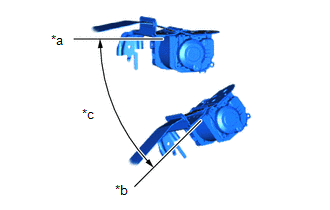
1. INSPECT REAR NO. 1 SEAT OUTER BELT ASSEMBLY
| (a) Before installing the rear No. 1 seat outer belt assembly, check the ELR function. NOTICE: Do not disassemble the retractor. (1) When the inclination of the retractor is 15° or less, check that the belt can be pulled from the retractor. When the inclination of the retractor is over 45°, check that the belt locks. If the result is not as specified, replace the rear No. 1 seat outer belt assembly. |
|
READ NEXT:
 Installation
INSTALLATION CAUTION / NOTICE / HINT HINT:
Use the same procedure for the RH and LH sides.
The procedure listed below is for the LH side.
A bolt without a torque specification is shown in the s
Seat Belt Tension Reducer System
Parts LocationPARTS LOCATION ILLUSTRATION *A w/ Memory - - *1 FRONT SEAT INNER BELT ASSEMBLY RH *2 FRONT SEAT INNER BELT ASSEMBLY LH *3 FRONT SEAT OUTER BELT ASSEMBLY RH *
SEE MORE:
Problem Symptoms Table
PROBLEM SYMPTOMS TABLE If there are no DTCs but the problem still occurs, check the suspected areas for each problem symptom in the order given in the table below and proceed to the relevant troubleshooting page. NOTICE: When replacing the skid control ECU (brake booster with master cylinder assembl
Telephone Microphone Assembly
ComponentsCOMPONENTS ILLUSTRATION *1 TELEPHONE MICROPHONE ASSEMBLY - -
© 2016-2026 Copyright www.lexunx.com
