Lexus NX: Installation
Lexus NX Service Manual / Vehicle Interior / Heating / Air Conditioning / Humidity Sensor / Installation
INSTALLATION
PROCEDURE
1. INSTALL AIR CONDITIONING THERMISTOR ASSEMBLY (HUMIDITY SENSOR)
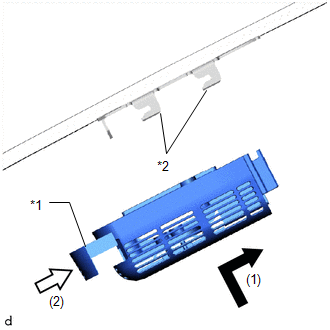
| *1 | Stopper |
| *2 | Bracket |
(a) Attach the 2 brackets, and carefully install the air conditioning thermistor assembly (humidity sensor) to the glass surface, preventing air bubbles from forming between the contact surfaces.
(b) Push in the stopper.
(c) Connect the connector.
2. INSTALL PROTECTOR
(a) Attach the 2 claws to install the protector.
3. INSTALL NO. 1 FORWARD RECOGNITION COVER
Click here .gif)
4. INSTALL NO. 2 FORWARD RECOGNITION COVER
Click here
READ NEXT:
 Components
COMPONENTS ILLUSTRATION *1 NO. 1 AIR DUCT *2 QUICK HEATER ASSEMBLY ● Non-reusable part - -
Removal
REMOVAL PROCEDURE 1. REMOVE LOWER INSTRUMENT PANEL Click here 2. REMOVE NO. 1 AIR DUCT Click here 3. REMOVE QUICK HEATER ASSEMBLY (a) Detach the clamp and disconnect the 2 connectors.
SEE MORE:
Inspection
INSPECTION PROCEDURE 1. INSPECT PARKING BRAKE ACTUATOR ASSEMBLY (a) Parking brake actuator assembly operation inspection (1) Apply voltage to the terminals of the parking brake actuator assembly and check that it operates as specified. OK: LH Tester Connection Parking Brake Actuator Assembl
Disassembly
DISASSEMBLY PROCEDURE 1. REMOVE CONSOLE COMPARTMENT DOOR SUB-ASSEMBLY (a) Remove the 4 screws and console compartment door sub-assembly. 2. REMOVE NO. 3 BOX PANEL (a) Detach the 2 clips and 2 claws, 3 guides and remove the No. 3 box panel. 3. REMOVE CONSOLE BOX PLATE (a
© 2016-2026 Copyright www.lexunx.com
