Lexus NX: Removal
REMOVAL
PROCEDURE
1. REMOVE LOWER INSTRUMENT PANEL
Click here .gif)
2. REMOVE NO. 1 AIR DUCT
Click here
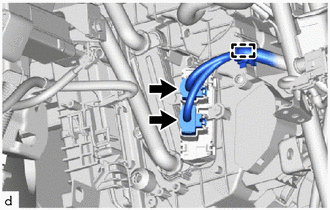
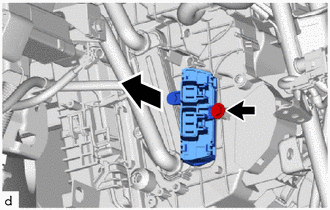
3. REMOVE QUICK HEATER ASSEMBLY
| (a) Detach the clamp and disconnect the 2 connectors. |
|
| (b) Remove the screw and quick heater assembly. |
|
READ NEXT:
 Inspection
INSPECTION PROCEDURE 1. INSPECT QUICK HEATER ASSEMBLY (a) Measure the resistance according to the value(s) in the table below. Standard Resistance: Tester Connection Condition Specified Con
Installation
INSTALLATION PROCEDURE 1. INSTALL QUICK HEATER ASSEMBLY (a) Install the quick heater assembly with the screw. (b) Attach the clamp and connect the 2 connectors. 2. INSTALL NO. 1 AIR DUC
SEE MORE:
Removal
REMOVAL PROCEDURE 1. REMOVE FUEL TANK ASSEMBLY Click here 2. DISCONNECT FUEL TANK MAIN TUBE SUB-ASSEMBLY (a) Remove the tube joint clip, then disconnect the fuel tank main tube sub-assembly from the fuel suction plate sub-assembly. NOTICE:
Remove dirt or foreign objects on the fuel tube j
Components
COMPONENTS ILLUSTRATION *1 AUTOMATIC LIGHT CONTROL SENSOR *2 NO. 1 SPEAKER OPENING COVER ASSEMBLY
© 2016-2026 Copyright www.lexunx.com
