Lexus NX: On-vehicle Inspection
ON-VEHICLE INSPECTION
PROCEDURE
1. INSPECT HOOD SUB-ASSEMBLY
(a) Check that the clearance measurements of areas A to E are within the standard ranges.
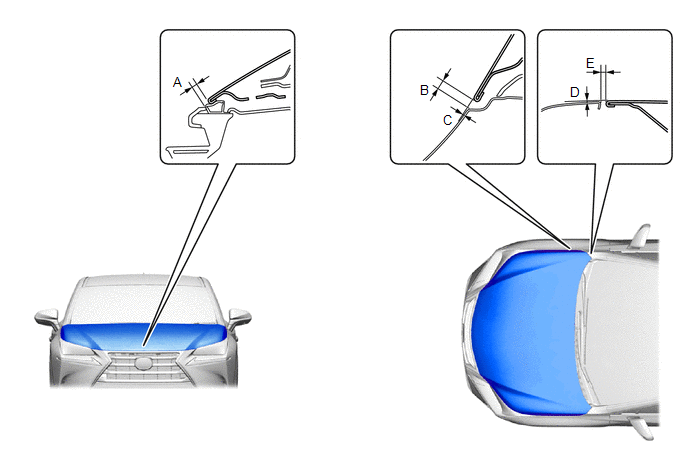
Standard Clearance:
| Area | Specified Condition | Area | Specified Condition |
|---|---|---|---|
| A | 2.45 to 6.45 mm (0.0965 to 0.2539 in.) | B | 3.7 to 6.7 mm (0.1457 to 0.2638 in.) |
| C | -0.8 to 2.2 mm (-0.0315 to 0.0866 in.) | D | -1.2 to 1.8 mm (-0.0472 to 0.0709 in.) |
| E | 3.0 to 6.0 mm (0.1181 to 0.2362 in.) | - | - |
READ NEXT:
 Disassembly
DISASSEMBLY PROCEDURE 1. REMOVE HOOD INSULATOR (a) Using a clip remover, remove the 7 clips. (b) Detach the 2 guides and remove the hood insulator. 2. REMOVE HOOD TO FRONT FENDER SEAL L
Adjustment
ADJUSTMENT CAUTION / NOTICE / HINT HINT:
Centering bolts are used to mount the hood hinge to the vehicle body and hood. The hood cannot be adjusted with the centering bolts on. Substitute the cente
Reassembly
REASSEMBLY PROCEDURE 1. INSTALL ENGINE HOOD LOCK STRIKER ASSEMBLY (a) Attach the guide. (b) Install the engine hood lock striker assembly with the 2 bolts. Torque: 8.0 N·m {82 kgf·cm, 71 in·lbf} 2
SEE MORE:
Collision has been detected or Collision Sensor Connection (Open) (P1606-308,P1606-317)
DTC SUMMARY MALFUNCTION DESCRIPTION The hybrid vehicle control ECU and airbag ECU detect that a collision has occurred and shut off the system main relay. The cause of this DTC may be one of the following:
Collision is detected
Detection sensor system malfunction
Airbag system malfunction
Components
COMPONENTS ILLUSTRATION *1 FRONT LOWER NO. 1 SUSPENSION ARM SUB-ASSEMBLY LH *2 FRONT STABILIZER BAR *3 FRONT STABILIZER BAR BUSHING LH *4 FRONT STABILIZER BAR BUSHING RH *5 FRONT STABILIZER LINK ASSEMBLY LH *6 FRONT STABILIZER LINK ASSEMBLY RH *7 FRONT SUSPENSION
© 2016-2026 Copyright www.lexunx.com
