Lexus NX: Components
COMPONENTS
ILLUSTRATION
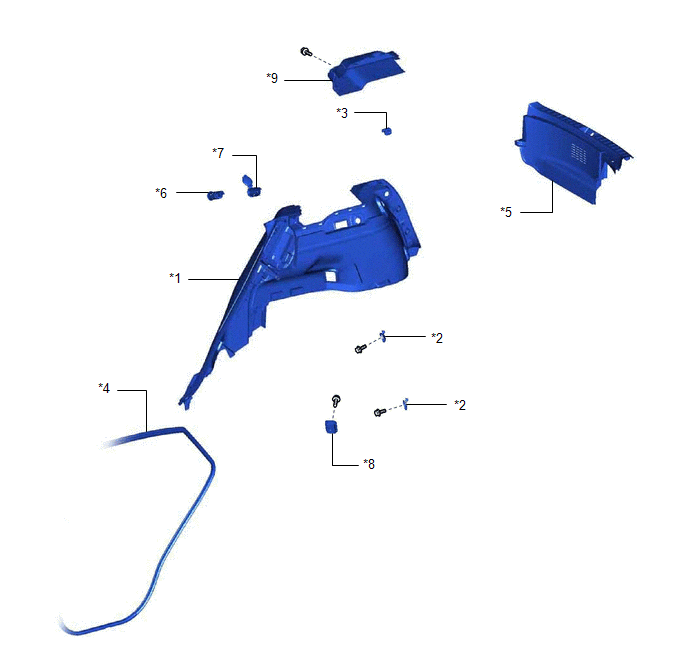
| *1 | DECK TRIM SIDE PANEL ASSEMBLY LH | *2 | LUGGAGE HOLD BELT STRIKER ASSEMBLY |
| *3 | NO. 1 LUGGAGE COMPARTMENT TRIM HOOK | *4 | REAR DOOR OPENING TRIM WEATHERSTRIP LH |
| *5 | REAR FLOOR FINISH PLATE | *6 | REAR NO. 1 POWER OUTLET SOCKET ASSEMBLY |
| *7 | REAR POWER OUTLET SOCKET COVER | *8 | ROPE HOOK ASSEMBLY |
| *9 | UPPER DECK TRIM SIDE BOARD LH | - | - |
READ NEXT:
 Removal
REMOVAL PROCEDURE 1. REMOVE REAR SEAT ASSEMBLY (a) for Power Seat: Click here (b) for Manual Seat: Click here 2. REMOVE REAR FLOOR FINISH PLATE Click here 3. REMOVE REAR DOOR OPENING TRIM W
Installation
INSTALLATION PROCEDURE 1. INSTALL REAR POWER OUTLET SOCKET COVER (a) Attach the 2 claws to install the rear power outlet socket cover. HINT: Use the same procedure to install the other power outlet so
Power Point Socket(for Console Box)
ComponentsCOMPONENTS ILLUSTRATION *1 NO. 1 POWER OUTLET SOCKET ASSEMBLY *2 NO. 1 POWER OUTLET SOCKET COVER *3 NO. 3 BOX PANEL - - RemovalREMOVAL PROCEDURE 1. REMOVE NO. 3 BOX
SEE MORE:
Installation
INSTALLATION PROCEDURE 1. INSTALL HV WATER PUMP BRACKET SUB-ASSEMBLY (a) Temporarily install the HV water pump bracket sub-assembly to the inverter bracket with bolt A. *a Bolt A *b Bolt B (b) Install bolt B. Torque: 10 N·m {102 kgf·cm, 7 ft·lbf} (c) Tighten bolt
Components
COMPONENTS ILLUSTRATION *1 FRONT INNER SEAT CUSHION SHIELD LH *2 FRONT LOWER SEAT CUSHION SHIELD *3 FRONT SEAT CUSHION SHIELD LH *4 FRONT SEAT HEADREST SUPPORT *5 SEATBACK FELT *6 SEPARATE TYPE FRONT SEATBACK COVER WITH PAD *7 HOG RING - - N*m (kgf*cm,
© 2016-2026 Copyright www.lexunx.com
