Lexus NX: Reassembly
REASSEMBLY
CAUTION / NOTICE / HINT
HINT:
- Use the same procedure for the RH and LH sides.
- The procedure listed below is for the LH side.
PROCEDURE
1. INSTALL NO. 2 ROOF CARRIER PROTECTOR
(a) Clean the roof rack surface.
(1) Remove the double-sided tape from the roof rack.
(2) Wipe off any tape adhesive residue with cleaner.
(b) Install the No. 2 roof carrier protector.
(1) Remove the peeling paper from the face of the No. 2 roof carrier protector.
HINT:
After removing the peeling paper, keep the exposed adhesive free from foreign matter.
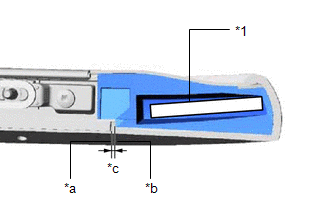
(2) Install the No. 2 roof carrier protector as shown in the illustration.
.png)
| *1 | No. 2 Roof Carrier Protector | - | - |
2. INSTALL NO. 1 ROOF CARRIER PROTECTOR
(a) Clean the roof rack surface.
(1) Remove the double-sided tape from the roof rack.
(2) Wipe off any tape adhesive residue with cleaner.
(b) Install the No. 1 roof carrier protector.
(1) Remove the peeling paper from the face of the No. 1 roof carrier protector.
HINT:
After removing the peeling paper, keep the exposed adhesive free from foreign matter.
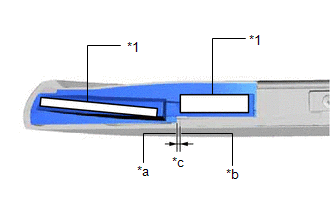
(2) Install the No. 1 roof carrier protector as shown in the illustration.
.png)
| *1 | No. 1 Roof Carrier Protector | - | - |
3. INSTALL NO. 1 ROOF CARRIER SEAL
(a) Clean the roof rack surface.
(1) Remove the double-sided tape from the roof rack.
(2) Wipe off any tape adhesive residue with cleaner.
(b) Install the No. 1 roof carrier seal.
(1) Remove the peeling paper from the face of the No. 1 roof carrier seal.
HINT:
After removing the peeling paper, keep the exposed adhesive free from foreign matter.
(2) Install the No. 1 roof carrier seal as shown in the illustration.
.png)
4. INSTALL FRONT ROOF RACK RETAINER LH
(a) Attach the claw to install the front roof rack retainer LH.
5. INSTALL REAR ROOF RACK LEG LH
(a) When reusing the screw:
(1) Clean the threaded portion on the vehicle body with non-residue solvent.
(2) Apply adhesive to the threads of the 2 screws.
Adhesive:
Toyota Genuine Adhesive 1324, Three Bond 1324 or equivalent
(b) Using a T30 "TORX" socket wrench, install the rear roof rack LH with the 2 screws.
Torque:
6.0 N·m {61 kgf·cm, 53 in·lbf}
6. INSTALL CENTER ROOF RACK SUPPORT LH
(a) When reusing the screw:
(1) Clean the threaded portion on the vehicle body with non-residue solvent.
(2) Apply adhesive to the threads of the 2 screws.
Adhesive:
Toyota Genuine Adhesive 1324, Three Bond 1324 or equivalent
(b) Using a T30 "TORX" socket wrench, install the center roof rack support LH with the 2 screws.
Torque:
6.0 N·m {61 kgf·cm, 53 in·lbf}
7. INSTALL FRONT ROOF RACK LEG LH
(a) When reusing the screw:
(1) Clean the threaded portion on the vehicle body with non-residue solvent.
(2) Apply adhesive to the threads of the 2 screws.
Adhesive:
Toyota Genuine Adhesive 1324, Three Bond 1324 or equivalent
(b) Using a T30 "TORX" socket wrench, install the front roof rack leg LH with the 2 screws.
Torque:
6.0 N·m {61 kgf·cm, 53 in·lbf}
8. INSTALL ROOF CARRIER SEAL
(a) Clean the roof rack surface.
(1) Remove the double-sided tape from the roof rack.
(2) Wipe off any tape adhesive residue with cleaner.
(b) Install the roof carrier seal.
(1) Remove the peeling paper from the face of the roof carrier seal.
HINT:
After removing the peeling paper, keep the exposed adhesive free from foreign matter.
| (2) Install the roof carrier seal as shown in the illustration. HINT: Do not overlap the guide. |
|
.png)
9. INSTALL NO. 3 ROOF CARRIER SEAL LH
(a) Clean the roof rack surface.
(1) Remove the double-sided tape from the roof rack.
(2) Wipe off any tape adhesive residue with cleaner.
(b) Install the No. 3 roof carrier seal LH.
(1) Remove the peeling paper from the face of the No. 3 roof carrier seal LH.
HINT:
After removing the peeling paper, keep the exposed adhesive free from foreign matter.
| (2) Install the No. 3 roof carrier seal LH as shown in the illustration. HINT: Do not overlap the guide. |
|
.png)
10. INSTALL NO. 2 ROOF CARRIER SEAL
(a) Clean the roof rack surface.
(1) Remove the double-sided tape from the roof rack.
(2) Wipe off any tape adhesive residue with cleaner.
(b) Install the No. 2 roof carrier seal.
(1) Remove the peeling paper from the face of the No. 2 roof carrier seal.
HINT:
After removing the peeling paper, keep the exposed adhesive free from foreign matter.
| (2) Install the No. 2 roof carrier seal as shown in the illustration. HINT: Do not overlap the guide. |
|
.png)
11. INSTALL REAR ROOF RACK LEG CUSHION LH
(a) Clean the roof rack surface.
(1) Remove the double-sided tape from the roof rack.
(2) Wipe off any tape adhesive residue with cleaner.
(b) Install the rear roof rack leg cushion LH.
(1) Remove the peeling paper from the face of the rear roof rack leg cushion LH.
HINT:
After removing the peeling paper, keep the exposed adhesive free from foreign matter.
| (2) Install the rear roof rack leg cushion LH as shown in the illustration. HINT: Do not allow the cushion to protrude from the roof rack. |
|
12. INSTALL FRONT ROOF RACK LEG CUSHION LH
(a) Clean the roof rack surface.
(1) Remove the double-sided tape from the roof rack.
(2) Wipe off any tape adhesive residue with cleaner.
(b) Install the front roof rack leg cushion LH.
(1) Remove the peeling paper from the face of the front roof rack leg cushion LH.
HINT:
After removing the peeling paper, keep the exposed adhesive free from foreign matter.
| (2) Install the front roof rack leg cushion LH as shown in the illustration. HINT: Do not allow the cushion to protrude from the roof rack. |
|
READ NEXT:
 Installation
INSTALLATION CAUTION / NOTICE / HINT HINT:
Use the same procedure for the RH and LH sides.
The procedure listed below is for the LH side.
PROCEDURE 1. INSTALL ROOF RACK ASSEMBLY (a) Install th
Components
COMPONENTS ILLUSTRATION *1 SIDE MUDGUARD SUB-ASSEMBLY LH *2 GROMMET ● Non-reusable part - - ILLUSTRATION *1 NO. 3 MOULDING TAPE - - ● Non-reusable part -
SEE MORE:
Door Control Switch
ComponentsCOMPONENTS ILLUSTRATION *1 DOOR CONTROL SWITCH ASSEMBLY *2 POWER WINDOW REGULATOR SWITCH ASSEMBLY WITH FRONT DOOR ARMREST BASE PANEL *3 FRONT DOOR ARMREST BASE PANEL - - RemovalREMOVAL CAUTION / NOTICE / HINT HINT:
Use the same procedure for RHD and LHD vehicles
Installation
INSTALLATION PROCEDURE 1. INSTALL SHIFT LEVER ASSEMBLY (a) Temporarily install the shift lever assembly with the 4 bolts. (b) Tighten the bolts in the order shown in the illustration. Torque: 12 N·m {122 kgf·cm, 9 ft·lbf} (c) Install the nut to the shift lever assembly. (d) Connec
