Lexus NX: Reassembly
REASSEMBLY
PROCEDURE
1. INSTALL COOLER DRYER
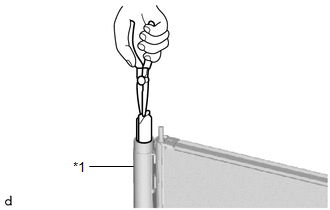
| (a) Using pliers, install a new cooler dryer to the modulator. |
|
| (b) Apply sufficient compressor oil to the O-ring. Compressor Oil: ND-OIL 11 or equivalent |
|

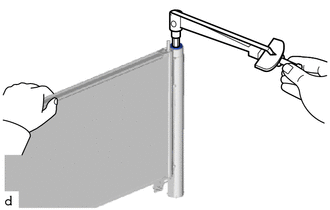
| (c) Using a 14 mm hexagon socket wrench, install the cap to the modulator. Torque: 2.9 N·m {30 kgf·cm, 26 in·lbf} |
|
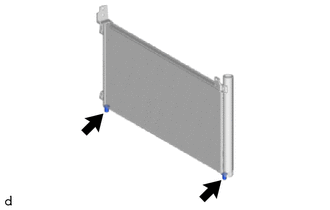
2. INSTALL NO. 1 COOLER CONDENSER CUSHION
| (a) Install the 2 No. 1 cooler condenser cushions to the cooler condenser assembly. |
|
READ NEXT:
 Installation
INSTALLATION PROCEDURE 1. INSTALL COOLER CONDENSER ASSEMBLY (a) Attach the 2 guides to install the cooler condenser assembly. NOTICE: Do not damage the cooler condenser assembly or radiator assembl
Cooler Expansion Valve
ComponentsCOMPONENTS ILLUSTRATION *1 AIR CONDITIONER TUBE AND ACCESSORY ASSEMBLY *2 COOLER EXPANSION VALVE *3 O-RING - - N*m (kgf*cm, ft.*lbf): Specified torque ● Non
Front Blower Motor
ComponentsCOMPONENTS ILLUSTRATION *1 BLOWER WITH FAN MOTOR SUB-ASSEMBLY *2 NO. 2 INSTRUMENT PANEL UNDER COVER SUB-ASSEMBLY RemovalREMOVAL PROCEDURE 1. REMOVE NO. 2 INSTRUMENT PANEL UNDE
SEE MORE:
Hybrid Powertrain Control Module (P0A1D-162,P0A1D-821,P0A1D-822,P0A1D-823)
DESCRIPTION The hybrid vehicle control ECU monitors its internal operation, it will store a DTC and perform fail-safe control if it detects the following malfunction. If the following DTC is output, replace the hybrid vehicle control ECU. DTC No. Detection Item DTC Detection Condition Troub
Installation
INSTALLATION CAUTION / NOTICE / HINT NOTICE:
When the brake pedal is first depressed after replacing the brake pads or pushing back the disc brake piston, DTC C1214 may be output. As there is no malfunction, clear the DTC.
While the auxiliary battery is connected, even if the power switch is of
© 2016-2026 Copyright www.lexunx.com
