Lexus NX: Removal
REMOVAL
PROCEDURE
1. REMOVE NO. 1 ENGINE UNDER COVER ASSEMBLY
Click here .gif)
2. REMOVE FAN AND GENERATOR V BELT
Click here
3. REMOVE FRONT SUSPENSION MEMBER REINFORCEMENT RH
Click here
4. REMOVE CRANKSHAFT PULLEY ASSEMBLY
Click here
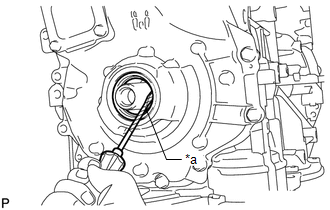
5. REMOVE TIMING CHAIN COVER OIL SEAL
| (a) Using a screwdriver, pry out the timing chain cover oil seal. NOTICE: Do not damage the surface of the timing chain cover oil seal press fit hole or the crankshaft. HINT: Tape the screwdriver tip before use. |
|
READ NEXT:
 Installation
INSTALLATION PROCEDURE 1. INSTALL TIMING CHAIN COVER OIL SEAL (a) w/o Side Lip: (1) Apply MP grease to the lip of a new timing chain cover oil seal. NOTICE:
Do not allow foreign matter to contact t
Components
COMPONENTS ILLUSTRATION *1 FLYWHEEL SUB-ASSEMBLY *2 REAR ENGINE OIL SEAL *3 TRANSMISSION INPUT DAMPER ASSEMBLY - - N*m (kgf*cm, ft.*lbf): Specified torque ● Non-reusab
SEE MORE:
Front Door Opening Trim Weatherstrip
ComponentsCOMPONENTS ILLUSTRATION *1 DOOR SCUFF PLATE ASSEMBLY LH *2 FRONT DOOR OPENING TRIM WEATHERSTRIP LH RemovalREMOVAL CAUTION / NOTICE / HINT HINT:
Use the same procedure for the RH and LH side.
The procedure listed below is for the LH side.
PROCEDURE 1. REMOVE DOOR SCUF
Inspection
INSPECTION PROCEDURE 1. INSPECT CYLINDER BLOCK FOR WARPAGE (a) Using a precision straightedge and feeler gauge, measure the warpage of the surface that contacts the cylinder head gasket. Maximum warpage: 0.05 mm (0.00197 in.) If the warpage is more than the maximum, replace the cylinder block.
© 2016-2026 Copyright www.lexunx.com
