Lexus NX: Removal
REMOVAL
PROCEDURE
1. PRECAUTION
NOTICE:
After turning the power switch off, waiting time may be required before disconnecting the cable from the negative (-) auxiliary battery terminal.
Click here 
2. REMOVE DECK BOARD ASSEMBLY
Click here
3. REMOVE NO. 3 DECK BOARD SUB-ASSEMBLY
Click here
4. REMOVE DECK FLOOR BOX LH
Click here
5. DISCONNECT CABLE FROM NEGATIVE AUXILIARY BATTERY TERMINAL
6. REMOVE AUXILIARY BATTERY
| (a) Detach the claw to open the auxiliary battery terminal cap. |
|
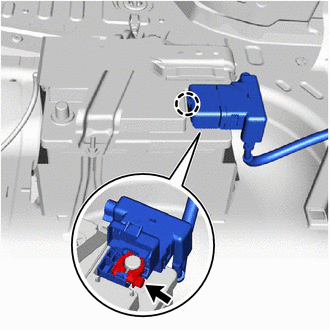
(b) Loosen the nut and disconnect the cable from the positive (+) auxiliary battery terminal.
| (c) Detach the clamp and disconnect the wire harness. |
|
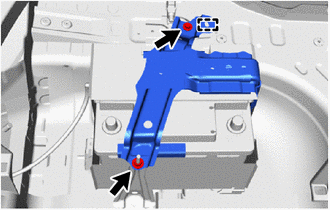
(d) Remove the bolt, nut and battery clamp sub-assembly from the auxiliary battery.
| (e) Disconnect the auxiliary battery hose. |
|
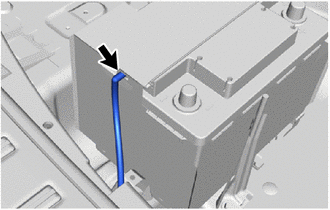
(f) Remove the battery insulator from the auxiliary battery.
(g) Remove the auxiliary battery.
READ NEXT:
 Installation
INSTALLATION PROCEDURE 1. INSTALL AUXILIARY BATTERY (a) Install the auxiliary battery. (b) Install the battery insulator to the auxiliary battery. (c) Install the L-shaped pipe section
Battery Thermometer Sensor
On-vehicle InspectionON-VEHICLE INSPECTION PROCEDURE 1. INSPECT THERMISTOR ASSEMBLY (a) Disconnect the thermistor assembly connector. *a Component without harness connected (Thermis
SEE MORE:
Data List / Active Test
DATA LIST / ACTIVE TEST DATA LIST HINT: Using the Techstream to read the Data List allows the values or states of switches, sensors, actuators and other items to be read without removing any parts. This non-intrusive inspection can be very useful because intermittent conditions or signals may be dis
Vehicle Information Unmatched (C168D)
DESCRIPTION If the vehicle information stored in the main body ECU (multiplex network body ECU) which is sent via CAN communication during the clearance warning ECU assembly self-diagnosis does not match that of clearance warning ECU assembly, DTC C168D is stored. DTC No. Detection Item DTC D
