Lexus NX: Removal
REMOVAL
CAUTION / NOTICE / HINT
HINT:
- Use the same procedure for the RH and LH sides.
- The procedure listed below is for the LH side.
PROCEDURE
1. REMOVE REAR WHEEL
Click here .gif)
2. DISCONNECT REAR SPEED SENSOR LH
(a) w/ AVS:
Click here
(b) w/o AVS:
Click here
3. DISCONNECT PARKING BRAKE WIRE ASSEMBLY NO.1
Click here
4. REMOVE NO. 1 FLOOR UNDER COVER
Click here
5. REMOVE REAR SHOCK ABSORBER ASSEMBLY LH
Click here
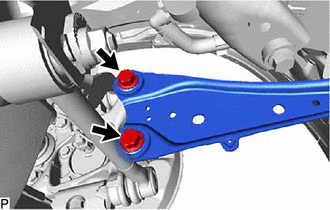
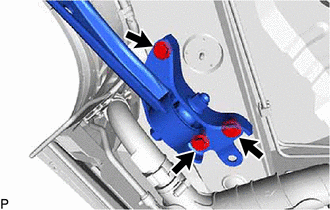
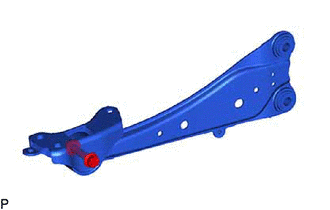
6. REMOVE REAR TRAILING ARM ASSEMBLY LH
| (a) Loosen the nut of the rear trailing arm assembly LH. |
|
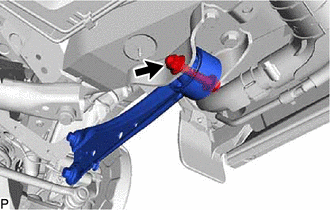
| (b) Remove the 2 bolts from the rear axle carrier LH. |
|
| (c) Remove the 3 bolts and rear trailing arm assembly LH from the vehicle. |
|
| (d) Remove the bolt, nut and rear suspension arm bracket from the rear trailing arm assembly LH. |
|
READ NEXT:
 Installation
INSTALLATION CAUTION / NOTICE / HINT HINT:
Use the same procedure for the RH and LH sides.
The procedure listed below is for the LH side.
PROCEDURE 1. TEMPORARILY INSTALL REAR TRAILING ARM ASS
Components
COMPONENTS ILLUSTRATION *A w/o AVS *B w/ AVS *1 REAR SPEED SENSOR LH *2 REAR SUSPENSION ARM COVER LH *3 REAR UPPER CONTROL ARM ASSEMBLY LH *4 PARKING BRAKE WIRE BRACKET
SEE MORE:
How To Proceed With Troubleshooting
CAUTION / NOTICE / HINT HINT:
Use the following procedure to troubleshoot the occupant classification system.
*: Use the Techstream.
PROCEDURE 1. VEHICLE BROUGHT TO WORKSHOP
NEXT 2. CUSTOMER PROBLEM ANALYSIS (a) Confirm problem symptoms. Click here
Motor Terminal Voltage (C1524,C1555)
DESCRIPTION The power steering ECU assembly supplies current to the power steering motor assembly through the motor circuit. DTC No. Detection Item DTC Detection Condition Trouble Area Warning Indicate Return-to-normal Condition C1524 Motor Terminal Voltage Short (or open) in mo
© 2016-2026 Copyright www.lexunx.com
