Lexus NX: Removal
REMOVAL
CAUTION / NOTICE / HINT
HINT:
- Use the same procedure for the RH and LH sides.
- The procedure listed below is for the LH side.
PROCEDURE
1. REMOVE REAR WHEEL
Click here .gif)
2. REMOVE REAR SUSPENSION ARM COVER LH
Click here
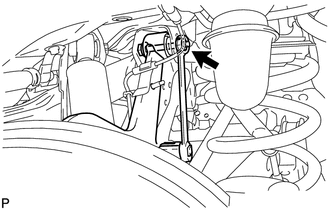
3. DISCONNECT REAR SPEED SENSOR LH
(a) w/ AVS:
Click here
(b) w/o AVS:
Click here
4. DISCONNECT PARKING BRAKE WIRE ASSEMBLY NO.1
Click here
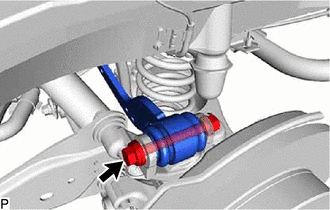
5. REMOVE REAR UPPER CONTROL ARM ASSEMBLY LH
.png)
| *a | Wooden Block |
| *b | Jack |
(a) Using a jack and wooden block, raise the vehicle and hold the rear No. 2 suspension arm assembly LH together with the rear axle carrier at the standard vehicle height.
| (b) Using a 19 mm ball joint lock nut wrench, remove the bolt, nut and rear upper control arm assembly LH from the rear suspension member. |
|
| (c) Remove the bolt, parking brake wire bracket and remove the rear upper control arm from the rear axle carrier. NOTICE: Since a stopper nut is used, remove the bolt. |
|
READ NEXT:
 Installation
INSTALLATION CAUTION / NOTICE / HINT HINT:
Use the same procedure for the RH and LH sides.
The procedure listed below is for the LH side.
PROCEDURE 1. TEMPORARILY INSTALL REAR UPPER CONTROL AR
Absorber Control Actuator (for Front Side)
On-vehicle InspectionON-VEHICLE INSPECTION PROCEDURE 1. INSPECT ABSORBER CONTROL ACTUATOR (a) Measure the resistance according to the value(s) in the table below. Standard Resistance: for LH Side
SEE MORE:
Data List / Active Test
DATA LIST / ACTIVE TEST DATA LIST HINT: Using the Techstream to read the Data List allows the values or states of switches, sensors, actuators and other items to be read without removing any parts. This non-intrusive inspection can be very useful because intermittent conditions or signals may be dis
Terminals Of Ecu
TERMINALS OF ECU CHECK STEREO COMPONENT EQUALIZER ASSEMBLY (a) Measure the voltage and resistance according to the value(s) in the table below. Terminal No. (Symbol) Wiring Color Terminal Description Condition Specified Condition I117-1 (GND) - Body ground W-B - Body ground Groun
