Lexus NX: Removal
REMOVAL
PROCEDURE
1. REMOVE NO. 3 DECK BOARD SUB-ASSEMBLY
Click here .gif)
2. REMOVE REAR DECK FLOOR BOX
Click here
3. REMOVE DECK FLOOR BOX LH
Click here
4. PRECAUTION
CAUTION:
Be sure to read Precaution thoroughly before servicing.
Click here
NOTICE:
After the power switch is turned off, there may be a waiting time before disconnecting the negative (-) auxiliary battery terminal.
Click here
5. DISCONNECT CABLE FROM NEGATIVE AUXILIARY BATTERY TERMINAL
CAUTION:
Wait at least 90 seconds after disconnecting the cable from the auxiliary battery negative (-) terminal to disable the SRS system.
(a) Loosen the nut and disconnect the auxiliary battery negative (-) terminal.
6. REMOVE SPIRAL CABLE WITH SENSOR SUB-ASSEMBLY
Click here
7. REMOVE WINDSHIELD WIPER SWITCH ASSEMBLY
Click here
8. REMOVE TILT AND TELESCOPIC SWITCH
Click here
9. REMOVE HEADLIGHT DIMMER SWITCH ASSEMBLY
| (a) Disconnect the connector. |
|
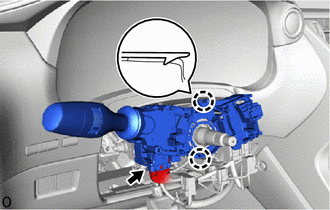
(b) Detach the 2 claws and remove the headlight dimmer switch assembly.
READ NEXT:
 Inspection
INSPECTION PROCEDURE 1. INSPECT HEADLIGHT DIMMER SWITCH ASSEMBLY (a) Inspect the light control switch. (1) Measure the resistance according to the value(s) in the table below. Standard Resistance:
Installation
INSTALLATION PROCEDURE 1. INSTALL HEADLIGHT DIMMER SWITCH ASSEMBLY (a) Attach the 2 claws to install the headlight dimmer switch assembly. (b) Connect the connector. 2. INSTALL TILT AND TELESCOPIC SWI
SEE MORE:
Data List / Active Test
DATA LIST / ACTIVE TEST DATA LIST Using the Techstream to read the Data List allows the values or states of switches, sensors, actuators and other items to be read without removing any parts. This non-intrusive inspection can be very useful because intermittent conditions or signals may be discovere
Inspection
INSPECTION PROCEDURE 1. INSPECT SEPARATE TYPE REAR SEATBACK COVER RH (REAR SEATBACK HEATER ASSEMBLY RH) (for RH Side) (a) Check the separate type rear seatback cover RH (rear seatback heater assembly RH). (1) Measure the resistance according to the value(s) in the table below. Standard Resistance
