Lexus NX: Removal
REMOVAL
PROCEDURE
1. REMOVE NO. 2 FORWARD RECOGNITION COVER
Click here .gif)
2. REMOVE NO. 1 FORWARD RECOGNITION COVER
Click here
3. REMOVE PROTECTOR
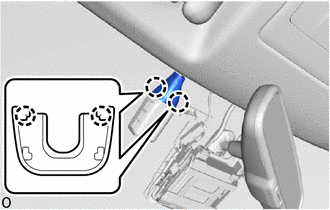
(a) Detach the 2 claws and remove the protector.
4. REMOVE AIR CONDITIONING THERMISTOR ASSEMBLY (HUMIDITY SENSOR)
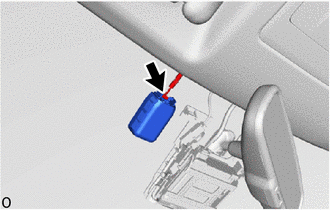
(a) Disconnect the connector.
| (b) Release the stopper by pulling it down. |
|
(c) Remove the air conditioning thermistor assembly (humidity sensor) as shown in the illustration.
READ NEXT:
 Inspection
INSPECTION PROCEDURE 1. INSPECT AIR CONDITIONING THERMISTOR ASSEMBLY (HUMIDITY SENSOR) (a) for Glass temperature sensor: (1) Measure the resistance according to the value(s) in the table below. *a
Installation
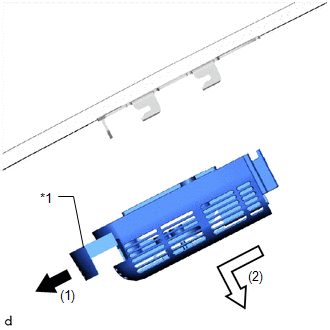
INSTALLATION PROCEDURE 1. INSTALL AIR CONDITIONING THERMISTOR ASSEMBLY (HUMIDITY SENSOR) *1 Stopper *2 Bracket (a) Attach the 2 brackets, and carefully install the air conditioning ther
SEE MORE:
On-vehicle Inspection
ON-VEHICLE INSPECTION PROCEDURE 1. INSPECT RADIO SETTING CONDENSER (a) With the radio setting condenser installed, check that there is no looseness or other abnormalities. (b) Measure the resistance of the radio setting condenser according to the value(s) in the table below. Standard Resistance:
Parts Location
PARTS LOCATION ILLUSTRATION *1 REAR HEIGHT CONTROL SENSOR SUB-ASSEMBLY LH *2 BRAKE BOOSTER WITH MASTER CYLINDER ASSEMBLY (SKID CONTROL ECU) *3 HEADLIGHT ASSEMBLY LH - HEADLIGHT ECU SUB-ASSEMBLY LH - HEADLIGHT UNIT ASSEMBLY LH *4 HEADLIGHT ASSEMBLY RH - HEADLIGHT ECU SUB-ASSEMBLY
© 2016-2026 Copyright www.lexunx.com
