Lexus NX: Removal
REMOVAL
PROCEDURE
1. REMOVE INSTRUMENT SIDE PANEL LH
Click here .gif)
2. REMOVE NO. 1 INSTRUMENT PANEL SAFETY PAD SUB-ASSEMBLY
Click here
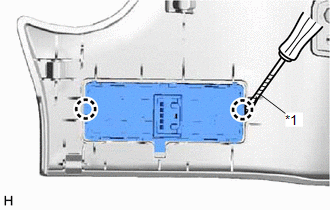
3. REMOVE TRIP SWITCH (LIGHT CONTROL RHEOSTAT)
| (a) Using a screwdriver, detach the 2 claws and remove the trip switch (light control rheostat). HINT: Tape the screwdriver tip before use. |
|
READ NEXT:
 Inspection
INSPECTION PROCEDURE 1. INSPECT TRIP SWITCH (LIGHT CONTROL RHEOSTAT) *1 Up Switch *2 Down Switch *a Component without harness connected (Trip Switch (Light Control Rheostat)) (a)
Installation
INSTALLATION PROCEDURE 1. INSTALL TRIP SWITCH (LIGHT CONTROL RHEOSTAT) (a) Attach the 2 claws to install the trip switch (light control rheostat). 2. INSTALL NO. 1 INSTRUMENT PANEL SAFE
SEE MORE:
Removal
REMOVAL PROCEDURE 1. REMOVE REAR SEAT ASSEMBLY (for Power Seat) Click here 2. REMOVE REAR SEAT ASSEMBLY (for Manual Seat) Click here 3. REMOVE TONNEAU COVER ASSEMBLY Click here 4. REMOVE DECK BOARD ASSEMBLY Click here 5. REMOVE NO. 2 DECK BOARD SUB-ASSEMBLY Click here 6. REMOVE
Components
COMPONENTS ILLUSTRATION *1 ELECTRICAL KEY ANTENNA *2 QUARTER OUTSIDE MOULDING SUB-ASSEMBLY LH *3 QUARTER OUTSIDE MOULDING SUB-ASSEMBLY RH *4 REAR BUMPER COVER *5 REAR FLOOR SIDE MEMBER COVER - - N*m (kgf*cm, ft.*lbf): Specified torque - -
© 2016-2026 Copyright www.lexunx.com
